How to create a table importing from a file?
(1) Prepare the file
- The file can be of TSV, CSV or Excel format.
- The first line of the file should contain the names of the columns.
 LabKey recommends that the column names contain only letters,
numbers and underscores, and that column names start by a letter or underscore.
LabKey recommends that the column names contain only letters,
numbers and underscores, and that column names start by a letter or underscore.- Create a subset of the data file containing only the first line with the columns names and some records of data (2 to 10 records, for
example) for the system to be able to guess the type of data contained in each column.
(2) Import the subset file
- Select the menu "
 --> Manage Lists" on the top right-hand side of the page.
- Click to the "Create New List" button.
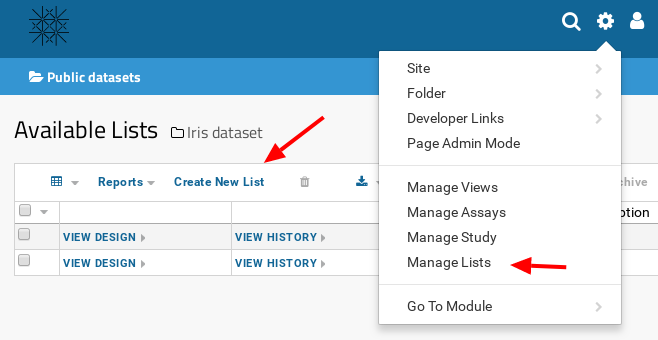
- Give a name for the new table.
- Activate the checkbox "Import from file".
- Click the button "Create List".
- Choose the file to import, the one with a subset of the data.
- LabKey will present a proposal of columns to import with a chosen data type.
There are some adaptations to the proposal, which can
be done before importing and creating the table:
- Columns can be excluded from the table by unselecting them.
It is recommended to exclude unwanted columns from import.
- The data type of a column can be changed by clicking on the data type dropdown box.
It is recommended to set the data type at
this point, since once the table is created, some changes are not allowed. E.g. An Integer column can not be changed to Double, a String
column can not be changed to Number, etc... To make such a change, it would be necessary to drop the table (delete the list) and create it
again, or to delete the field and add a new one.
- Column properties can be set by clicking on the blue triangle next to the column name.
That's optional since it can also be
performed after the table has been created, by using the feature "Edit Design".
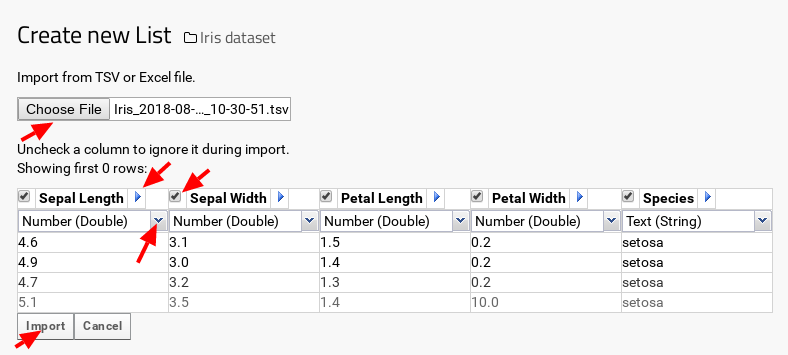
- Once all columns have been adapted, click the "Import" button.
The table and its data will be presented.
(3) How to further edit the design of a table?
For detailed information, check the LabKey documentation: Edit a List Design.
Or check a selection of topics in our FAQ page Tables: Inspect and Manipulate.
How to add a record in an existing table?
- In the table view, click to the plus sign and select "Insert new row".
- Fill out the form and confirm by clicking "Submit".

How to populate an existing table with data from a file?
 Check recommendations about the data file to import in the FAQ What should I
take into account when importing data from a file?.
 It might be useful to download an empty template file to
populate it with the data to insert. Check the details in the FAQ How can I get a template file from an existing
list?.
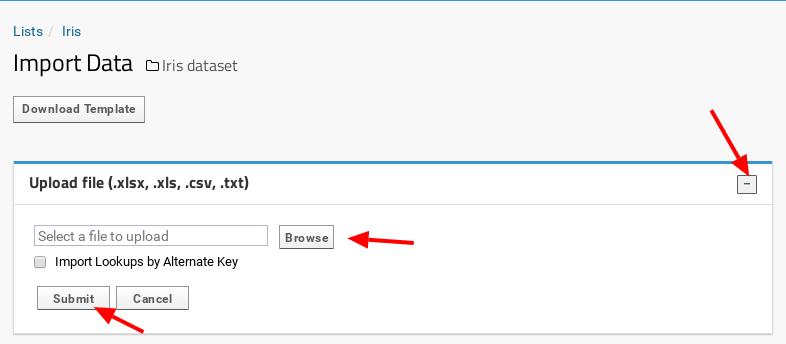
- In the table view, click to the plus sign and select "Import bulk data".

- Expand the "Upload file" option and using the "Browse" button, select the data file to import.
- Confirm by clicking the button "Submit".
What should I take into account when importing data from a file?
- Only the file columns which name is the same as the column name or column label in the list, case insensitive, will be imported. The rest
of file columns will be ignored.
- Non-text columns which contain text indicating a missing value (e.g: "UNKNOWN", missing boolean values, etc...) need to be activated to
accept "Missing Value Indicators".
- Rows with non-primary key equal values will be added to the table.
- Rows with primary key equal values will not be imported. Import will fail giving as error message that duplicated keys are not allowed.
How can I get a template file from an existing list?
It is possible to download an empty template file for a list, which will contain a row with the names of the list's columns. The template can
be used to populate it with data and later to import it into LabKey.
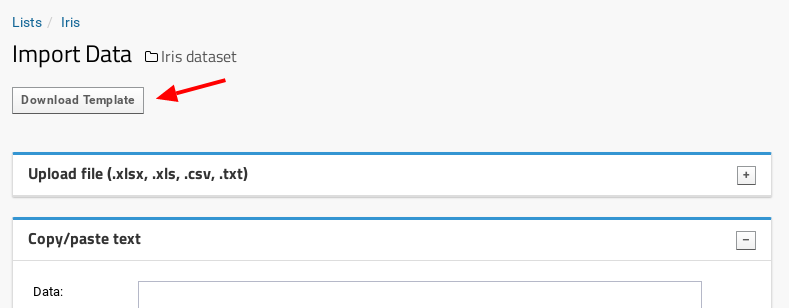
- In the table view, click to the plus sign and select "Import bulk data".

- Click the "Download Template" button.
What are "lookup" columns?
That are list's columns which pull data from another list.
They allow creating views that contain data from two different tables.
Example:
- We have two lists:
- "Specimen": contains data from different specimens of fishes.
- "Species": contains the names of different fish species as reference values.
- We link the column "SpeciesID" in the list "Specimen" to the same column in the reference list "Species", using a lookup column.
- Result:
- We can create a view combining columns from both lists, allowing to have the information about species stored only once in the
reference table.
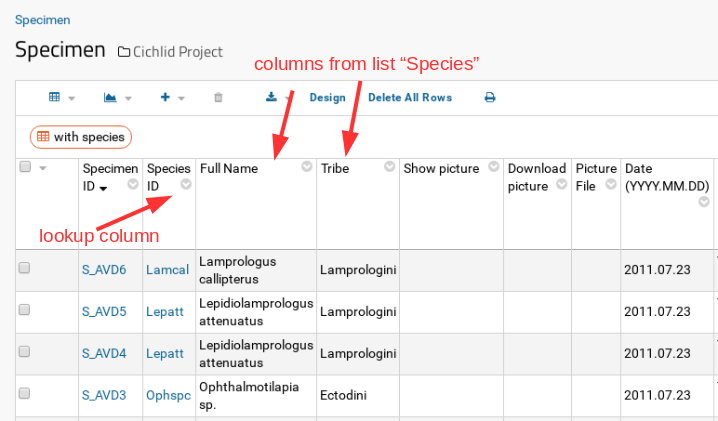
- The field "SpeciesID" in the "Specimen" list will only recognise values which are existing in the list "Species".
- When inserting a new row in the list "Specimen", it will not be necessary to write the species: there will be a list with the
existing species to choose from.
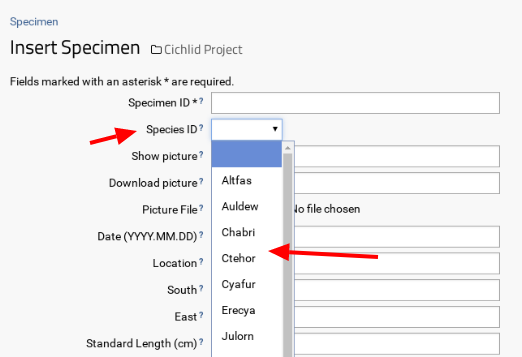
More information about lookup lists can be found in the LabKey documentation: Lookup Columns.
How to create a lookup column?
On the reference table
- On the header of the table click "Design".
- Click "Edit Design".
- In the section "List Properties" select as "Title Field" the column which will be used as reference value for the lookup link (in this
example this is the field "SpeciesID").
- Save the table design by clicking on the "Save" button on the top of the page.
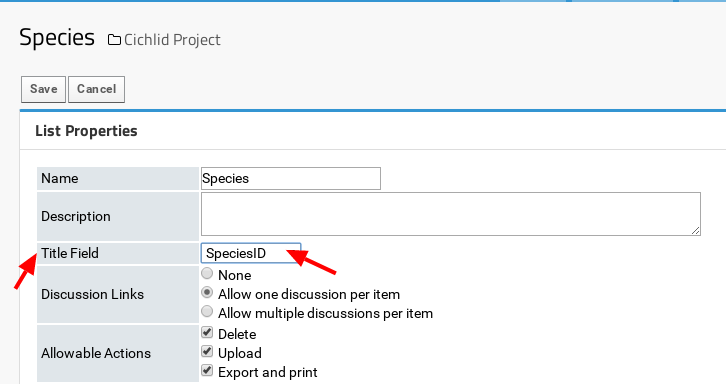
On the main data table
- On the header of the table click "Design".
- Click "Edit Design".
- In the section "List Fields" select the corresponding field (in this example "SpeciesID").
- Click on the "Type" text box.
- Activate the "Lookup" radio button.
- Select:
- Folder: Current folder.
- Schema: lists.
- Table: the list to link (in this example "Species").
- Click on the "Apply" button.
- Save the table design by clicking on the "Save" button on the top of the page.
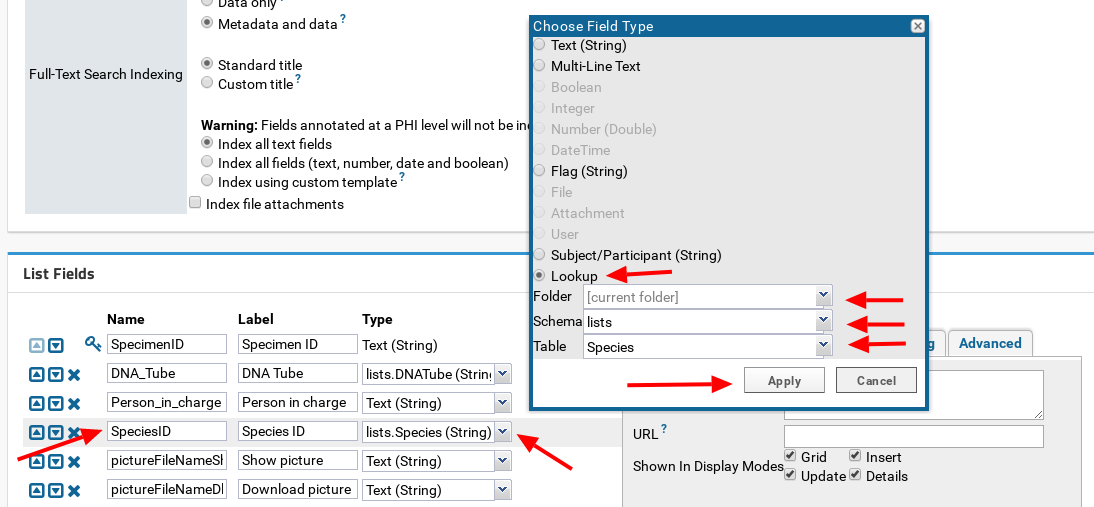
How to link two lists using lookup columns?
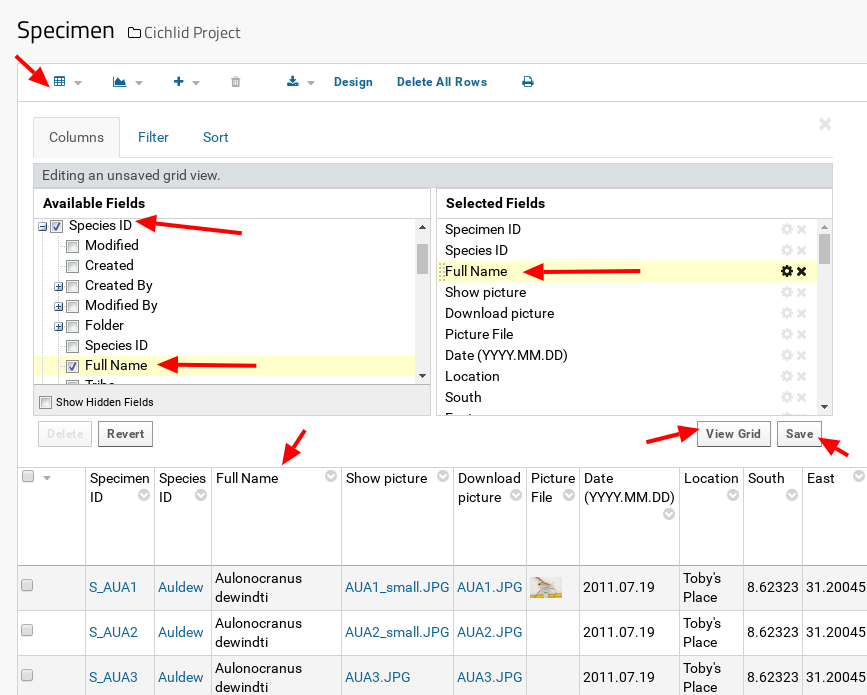
- On the header of the table expand the dropdown menu "Grid Views" with icon
 and select "Customize Grid".
- From the "Available Fields" list, expand the linked column ("Species ID" in this example ).
- Select the field or fields in the lookup table which should appear in the list view ("Full Name" in this example).
- Click on the button "View Grid" to see the resulting view, or "Save" to assign a name to the view and keep it.
How can I export / import several lists at once?
Export: It is possible to create a list archive, which is a zip file containing all the lists available in a folder.
That can be used to backup the data of certain lists, or to copy/migrate certain lists to other LabKey projects.
- Select the menu "
 --> Manage Lists" on the top right-hand side of the page.
- Select the lists to export by activating the corresponding checkbox on the left column.
- Click the "Export List Archive" button.
- That will create a zip file to download.
Import: This archive can then be used to create the imported tables in a chosen folder.
- Navigate to the folder where the lists are to be imported.
- Select the menu "
 --> Manage Lists" on the top right-hand side of the page.
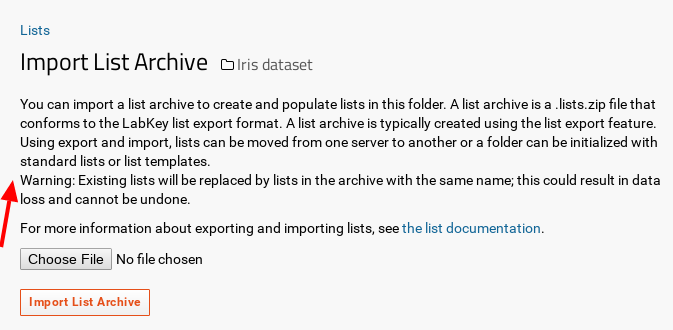
- Click the "Import List Archive" button.
- Click the "Choose File" button and select the list archive zip file to import.
- Confirm by clicking the "Import List Archive" button.
 If the folder already contains lists, but they are not defined in the list archive, they will be left untouched, therefore
no data from those lists will be lost.
 Already existing lists will be replaced!!! When importing a list archive which contains some already exiting list in
the selected folder, the existing list or lists will be deleted and recreated, therefore the data of the existing list(s) will be lost!
 LabKey recommends that the column names contain only letters,
numbers and underscores, and that column names start by a letter or underscore.
 --> Manage Lists" on the top right-hand side of the page.


 Check recommendations about the data file to import in the FAQ What should I
take into account when importing data from a file?.
 It might be useful to download an empty template file to
populate it with the data to insert. Check the details in the FAQ How can I get a template file from an existing
list?.


 and select "Customize Grid".

 --> Manage Lists" on the top right-hand side of the page.
 --> Manage Lists" on the top right-hand side of the page.
 If the folder already contains lists, but they are not defined in the list archive, they will be left untouched, therefore
no data from those lists will be lost.
 Already existing lists will be replaced!!! When importing a list archive which contains some already exiting list in
the selected folder, the existing list or lists will be deleted and recreated, therefore the data of the existing list(s) will be lost!
