Table of Contents |
guest 2024-12-23 |
General
Tables: Create and Populate
Tables: Inspect and Manipulate
Queries
User Administration
Data Protection
Message Board
Surveys
Formats
Folder Management
APIs
Rlabkey API
Python API
Security
LabKey releases compatibility issues
New UI
LabKey Comunity Resources
FAQs
Welcome to the sciCORE LabKey server.
Please check the FAQ for general LabKey information. Do not hesitate to contact the sciCORE team at scicore-admin@unibas.ch if you have further questions.FAQs
General
What is a "project" in LabKey?
A LabKey server installation is organised as a folder hierarchy, where the first and second ranks of folders have special names: site and projects. Lower ranks have no special name, so they are referred as folders and/or sub-folders.
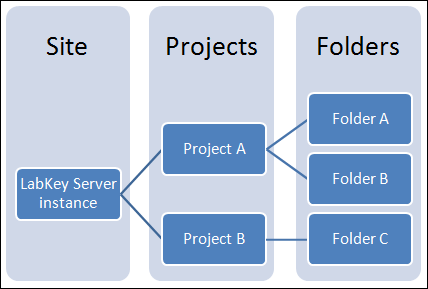
The top of the hierarchy folder is called the site, the next level of folders are called projects. A project can contain any number of folders and sub-folders underneath.
Example:
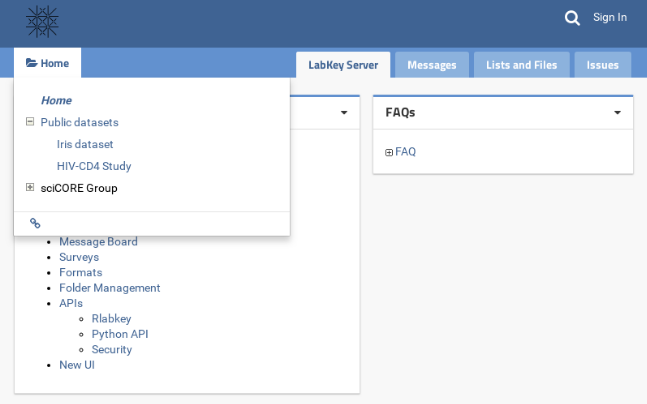
In the screenshot below, there are three projects:
- "Home"
- "Public Datasets"
- "sciCORE Group"
When expanding the "Public Datasets" project, it can be seen that this project contains two folders:
- "Iris Dataset"
- "HIV-CD4 Study"
Detailed information can be found in the LabKey documentation Projects and Folders.
How can I add a sub-folder in a project or folder?
There are two ways:
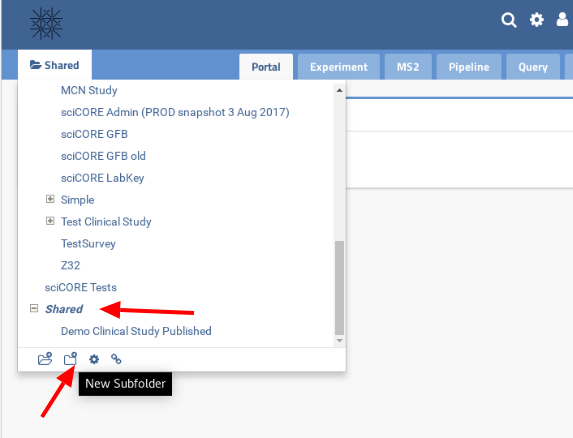
(1) Shortcut:
- Navigate to the project or folder in where you need to create the sub-folder (in the screenshot below it is the project "Shared").
- Click on the "New Subfolder" icon.
- For a general purpose folder type, select "Collaboration".
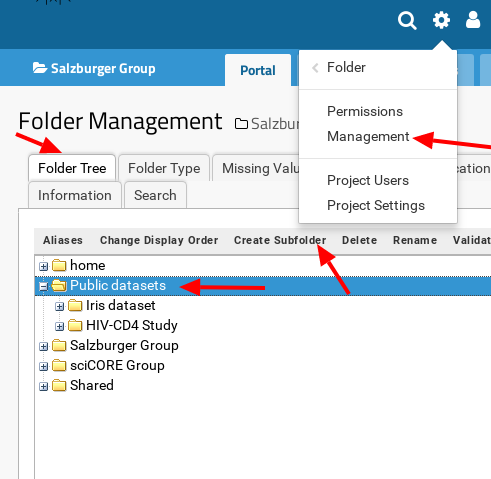
(2) General, for folder management:
- Select the menu "
 --> Folder --> Management" on the top right-hand side of the page.
 - In the "Folder Tree" tab, navigate to the project or folder in where you need to create the sub-folder.
- Click on the "Create Subfolder" button.
- For a general purpose folder type, select "Collaboration".
How to delete a project or folder?
- Select the menu "
 --> Folder --> Management" on the top right-hand side of the page and, in the tab "Folder Tree", select the project or folder to delete.
 - Hit the button "Delete" and confirm deletion.
How to change the contents of a page?
Administrators can make changes to the contents of a page (including web parts and wikis) by entering "Page Admin Mode".
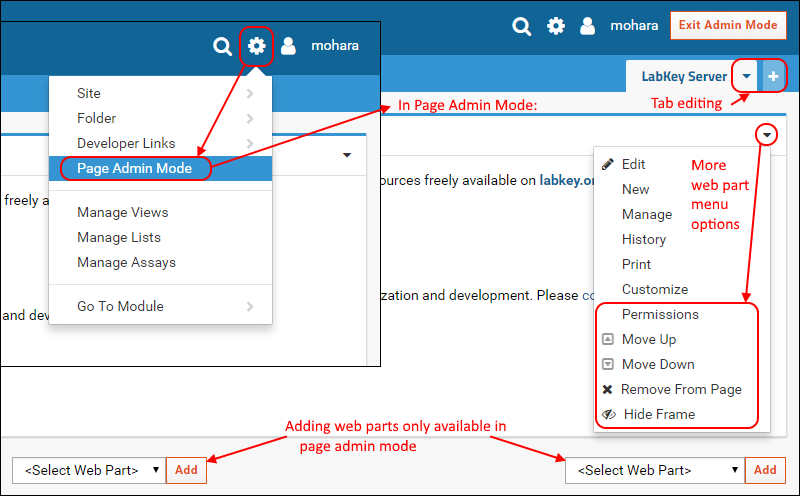
How to enter "Page Admin Mode"
Select " --> Page Admin Mode". The option stays active until the user deactivates it by clicking on "Exit Admin Mode".
How to add web parts
Select the target web part from the "<Select Web Part>" dropdown box and click the "Add" button.
How to add a new tab or edit an existing one
- To add a new tab, click the
 mini tab on the right of the header bar.
 - To edit a current tab, pulldown the triangle menu on the right side of the tab.
 Only when there is more than on tab, the tabs will be displayed across the header bar.
More infos
In the LabKey's documentation Page Admin Mode.
How to report requirements?
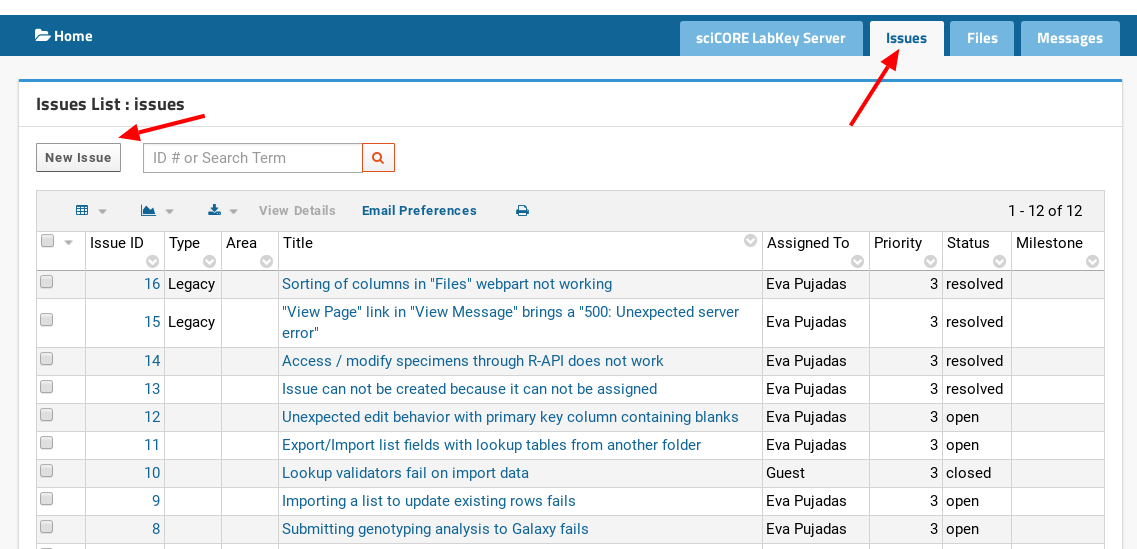
- Navigate to the "Home" project.
- Select the "Issues" tab and click the "New Issue" button.
- Fill out the form with detailed requirements. It is possible to add files for documentation purposes using the "Attach a file" link.
- Assign it to somebody in the sciCORE team.
- Save the issue clicking the "Save" button.
How to delete an issue?
LabKey does not provide any possibility to delete an issue through the user interface.
The only way is to delete the record directly from the database. This is officially unsupported because of the risk to break the application.
See more detailed infos in the LabKey forum.
Where can I get further documentation about LabKey?
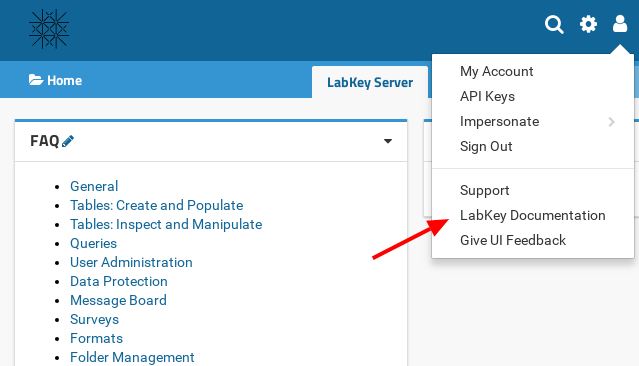
Select the menu " --> LabKey Documentation" on the top right-hand side of the page, to access tutorials, videos and other documentation.
Tables: Create and Populate
How to create a table importing from a file?
(1) Prepare the file
- The file can be of TSV, CSV or Excel format.
- The first line of the file should contain the names of the columns.
-
 LabKey recommends that the column names contain only letters, numbers and underscores, and that column names start by a letter or underscore.
 - Create a subset of the data file containing only the first line with the columns names and some records of data (2 to 10 records, for example) for the system to be able to guess the type of data contained in each column.
(2) Import the subset file
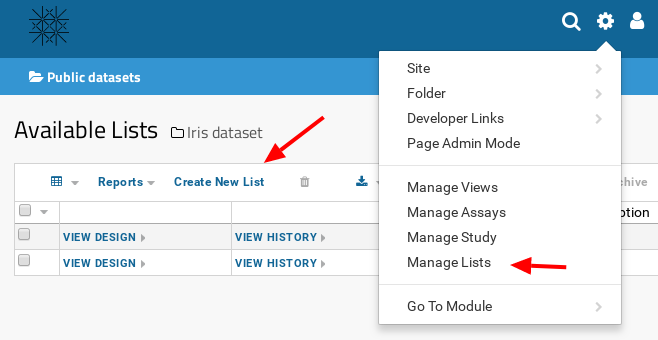
- Select the menu "
 --> Manage Lists" on the top right-hand side of the page.
 - Click to the "Create New List" button.
- Give a name for the new table.
- Activate the checkbox "Import from file".
- Click the button "Create List".
- Choose the file to import, the one with a subset of the data.
- LabKey will present a proposal of columns to import with a chosen data type.
There are some adaptations to the proposal, which can be done before importing and creating the table: -
- Columns can be excluded from the table by unselecting them.
It is recommended to exclude unwanted columns from import. - The data type of a column can be changed by clicking on the data type dropdown box.
It is recommended to set the data type at this point, since once the table is created, some changes are not allowed. E.g. An Integer column can not be changed to Double, a String column can not be changed to Number, etc... To make such a change, it would be necessary to drop the table (delete the list) and create it again, or to delete the field and add a new one. - Column properties can be set by clicking on the blue triangle next to the column name.
That's optional since it can also be performed after the table has been created, by using the feature "Edit Design".
- Columns can be excluded from the table by unselecting them.
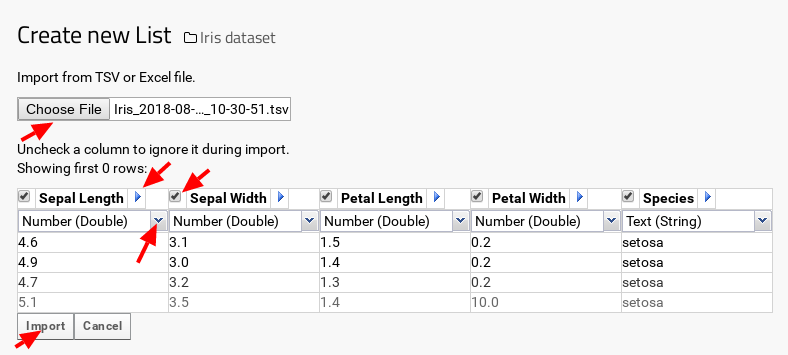
- Once all columns have been adapted, click the "Import" button.
The table and its data will be presented.
(3) How to further edit the design of a table?
For detailed information, check the LabKey documentation: Edit a List Design.
Or check a selection of topics in our FAQ page Tables: Inspect and Manipulate.
How to add a record in an existing table?
- In the table view, click to the plus sign and select "Insert new row".
- Fill out the form and confirm by clicking "Submit".

How to populate an existing table with data from a file?
 Check recommendations about the data file to import in the FAQ What should I take into account when importing data from a file?.
 It might be useful to download an empty template file to populate it with the data to insert. Check the details in the FAQ How can I get a template file from an existing list?.
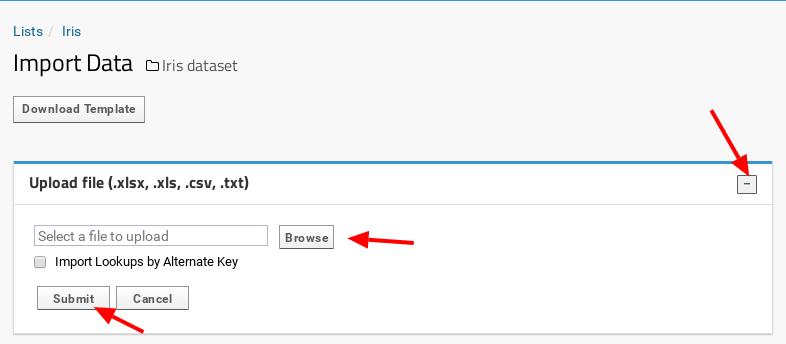
- In the table view, click to the plus sign and select "Import bulk data".

- Expand the "Upload file" option and using the "Browse" button, select the data file to import.
- Confirm by clicking the button "Submit".
What should I take into account when importing data from a file?
- Only the file columns which name is the same as the column name or column label in the list, case insensitive, will be imported. The rest of file columns will be ignored.
- Non-text columns which contain text indicating a missing value (e.g: "UNKNOWN", missing boolean values, etc...) need to be activated to accept "Missing Value Indicators".
- Rows with non-primary key equal values will be added to the table.
- Rows with primary key equal values will not be imported. Import will fail giving as error message that duplicated keys are not allowed.
How can I get a template file from an existing list?
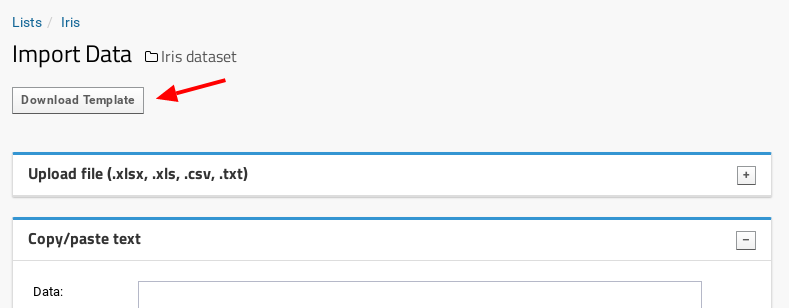
It is possible to download an empty template file for a list, which will contain a row with the names of the list's columns. The template can be used to populate it with data and later to import it into LabKey.
- In the table view, click to the plus sign and select "Import bulk data".

- Click the "Download Template" button.
What are "lookup" columns?
That are list's columns which pull data from another list.
They allow creating views that contain data from two different tables.
Example:
- We have two lists:
- "Specimen": contains data from different specimens of fishes.
- "Species": contains the names of different fish species as reference values.
- We link the column "SpeciesID" in the list "Specimen" to the same column in the reference list "Species", using a lookup column.
- Result:
- We can create a view combining columns from both lists, allowing to have the information about species stored only once in the reference table.
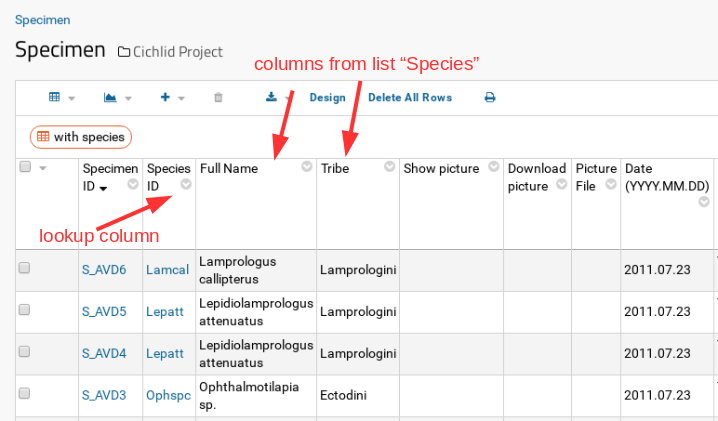
- The field "SpeciesID" in the "Specimen" list will only recognise values which are existing in the list "Species".
- When inserting a new row in the list "Specimen", it will not be necessary to write the species: there will be a list with the existing species to choose from.
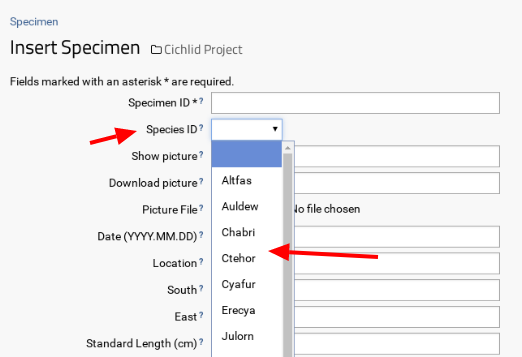
More information about lookup lists can be found in the LabKey documentation: Lookup Columns.
How to create a lookup column?
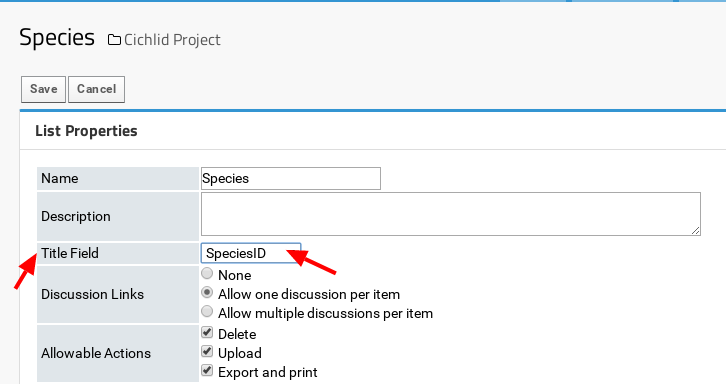
On the reference table
- On the header of the table click "Design".
- Click "Edit Design".
- In the section "List Properties" select as "Title Field" the column which will be used as reference value for the lookup link (in this example this is the field "SpeciesID").
- Save the table design by clicking on the "Save" button on the top of the page.
On the main data table
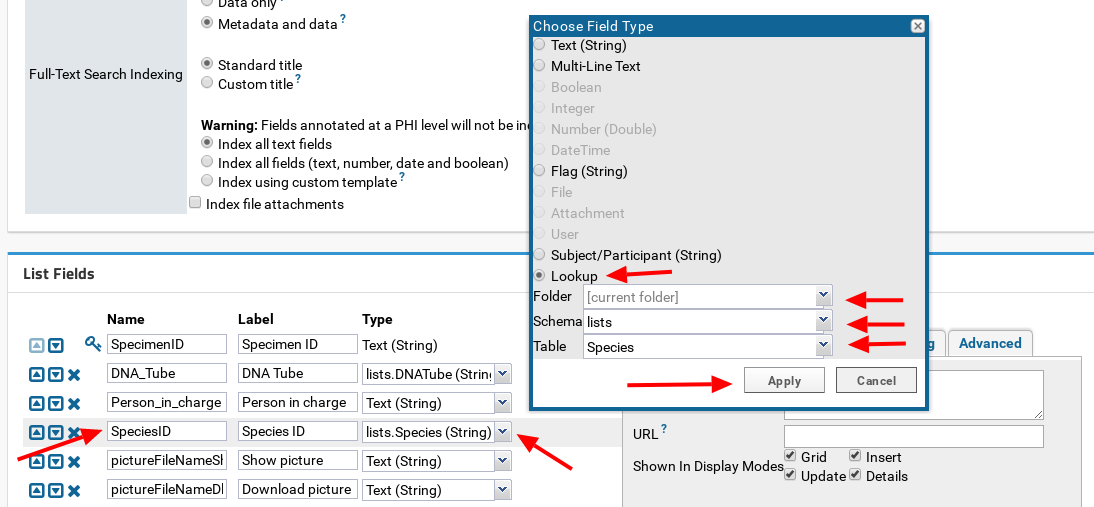
- On the header of the table click "Design".
- Click "Edit Design".
- In the section "List Fields" select the corresponding field (in this example "SpeciesID").
- Click on the "Type" text box.
- Activate the "Lookup" radio button.
- Select:
-
- Folder: Current folder.
- Schema: lists.
- Table: the list to link (in this example "Species").
- Click on the "Apply" button.
- Save the table design by clicking on the "Save" button on the top of the page.
How to link two lists using lookup columns?
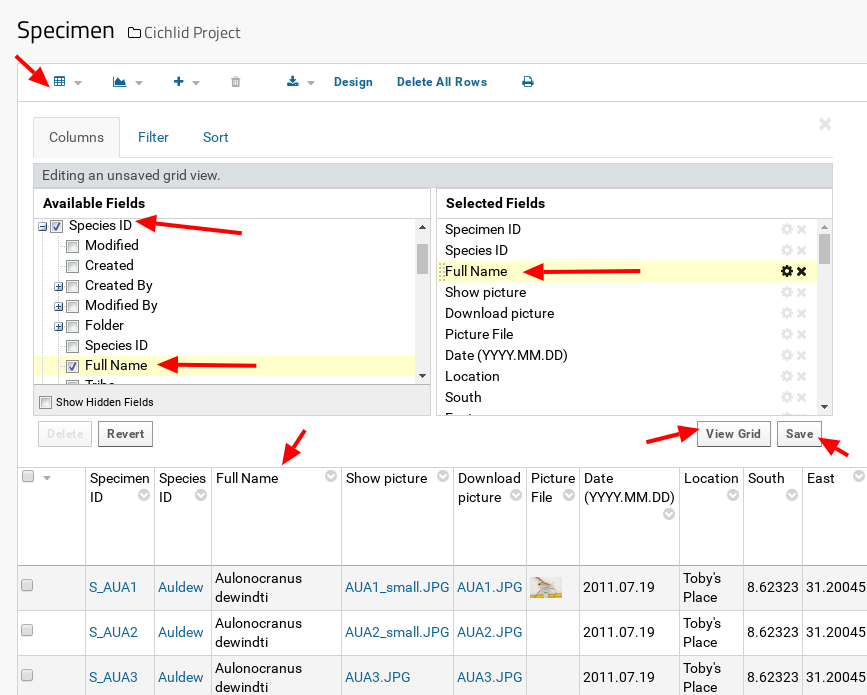
- On the header of the table expand the dropdown menu "Grid Views" with icon
 and select "Customize Grid".
 - From the "Available Fields" list, expand the linked column ("Species ID" in this example ).
- Select the field or fields in the lookup table which should appear in the list view ("Full Name" in this example).
- Click on the button "View Grid" to see the resulting view, or "Save" to assign a name to the view and keep it.
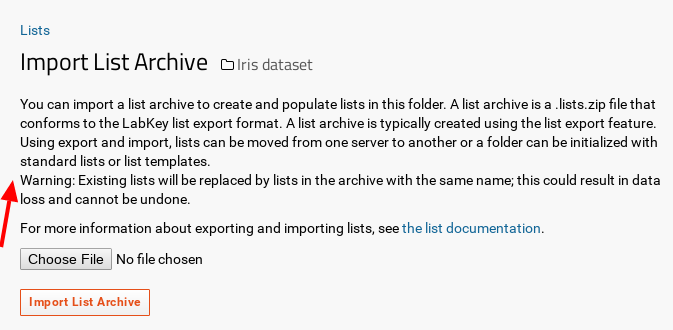
How can I export / import several lists at once?
Export: It is possible to create a list archive, which is a zip file containing all the lists available in a folder.
That can be used to backup the data of certain lists, or to copy/migrate certain lists to other LabKey projects.
- Select the menu "
 --> Manage Lists" on the top right-hand side of the page.
 - Select the lists to export by activating the corresponding checkbox on the left column.
- Click the "Export List Archive" button.
- That will create a zip file to download.
Import: This archive can then be used to create the imported tables in a chosen folder.
- Navigate to the folder where the lists are to be imported.
- Select the menu "
 --> Manage Lists" on the top right-hand side of the page.
 - Click the "Import List Archive" button.
- Click the "Choose File" button and select the list archive zip file to import.
- Confirm by clicking the "Import List Archive" button.
 If the folder already contains lists, but they are not defined in the list archive, they will be left untouched, therefore no data from those lists will be lost.
 Already existing lists will be replaced!!! When importing a list archive which contains some already exiting list in the selected folder, the existing list or lists will be deleted and recreated, therefore the data of the existing list(s) will be lost!
Tables: Inspect and Manipulate
How to inspect data in a table?
Data can be filtered, sorted and graphically represented.
Filtering and sorting:
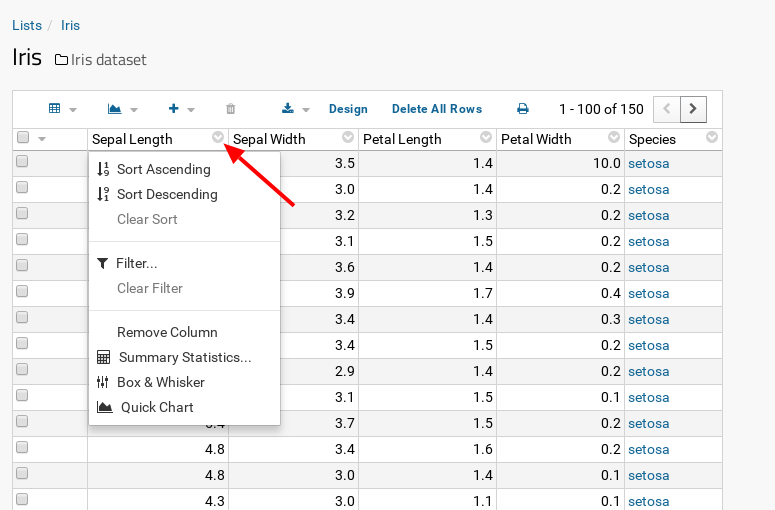
- In the table, click on the header of a column; a menu appears with choices to sort, filter or create several kinds of charts and summaries for the column data.
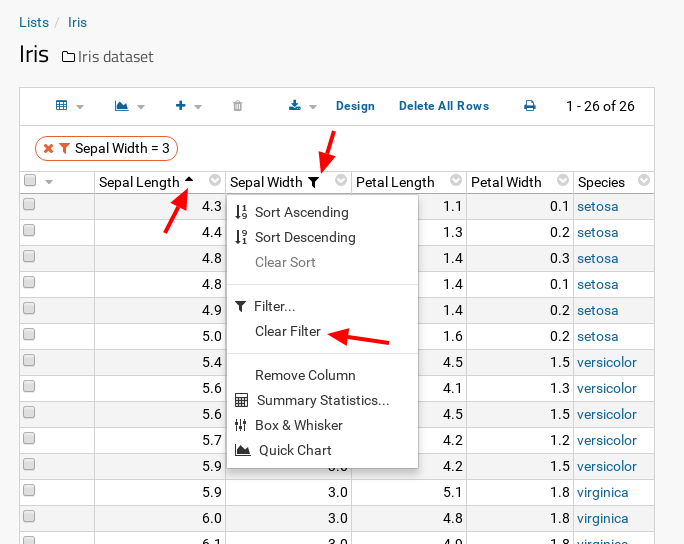
- After sorting and/or filtering, icons appear in the corresponding columns. To remove sorting and/or filtering, click in the menu "Clear Sort" and/or "Clear Filter".
Several sorts and/or filters can be applied in several columns at the same time.
Creating charts:
Two possibilities:
- Use the charts menu(es) on the header of the columns (e.g. "Quick Chart").
- Use the menu "Charts / Reports" icon
 at the top of the table.
How to add / remove a column in a table?
- On the header of the table click "Design".
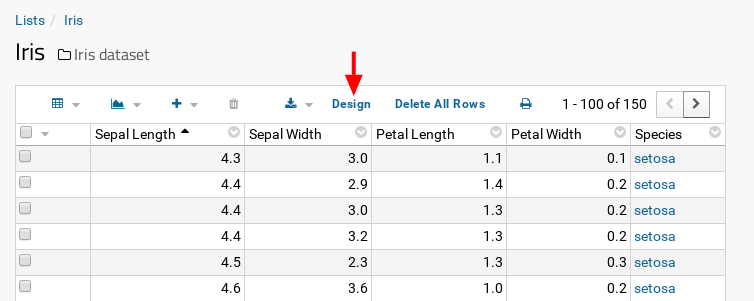
- Click "Edit Design".
- Click "Add Field" at the bottom of the page, and enter at least a name and a type for the new field.
With the arrow icons, the fields can be placed more up or down in the list of fields.
To remove a field, click on the cross icon next to the field. By deleting a field, all its data will be deleted as well.
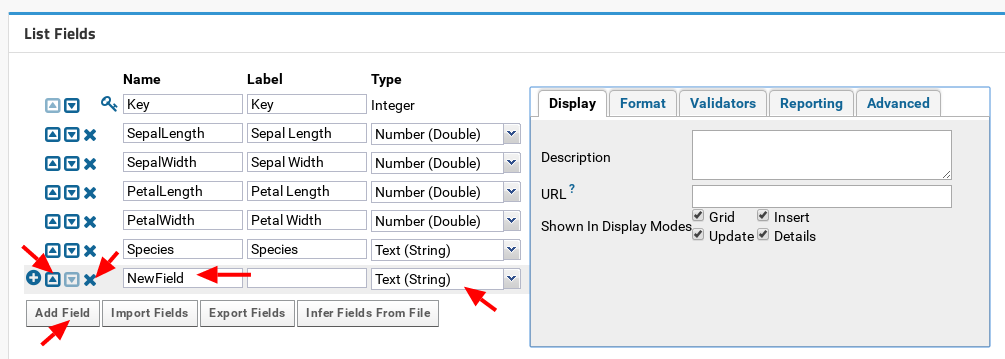
- Confirm by clicking the "Save" button placed at the top of the page.
- Once a new field has been added, it is necessary to make it visible in the list or table. See the next question How to add / remove a column in a view?.
How to add / remove a column in a view?
- To visualize a column from the current table or from a linked table, select "Customize Grid" from the dropdown menu "Grid Views" with icon
 .
.
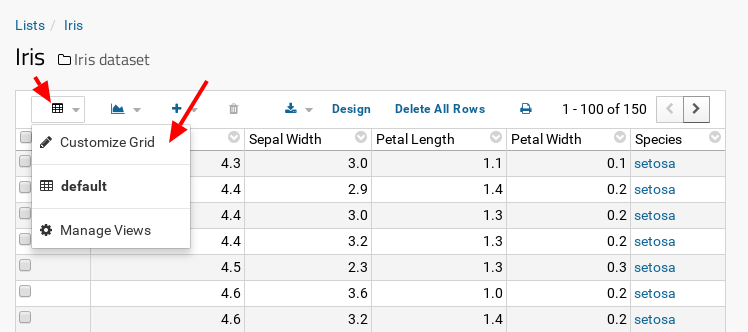
- Check the new field in the right-side list "Available Fields" and it will appear in the left-side list "Selected Fields".
Remarks:
- If the column to be seen is a hidden one, activate first the checkbox "Show Hidden Fields" on the bottom right side of the "Available Fields" panel.
- If the column to be seen belongs to another table, first expand the joined field by clicking the cross placed on the left side of the field name in the "Available Fields" panel. Please, check the FAQ How to link two lists using lookup columns? for more details on adding columns from other tables.
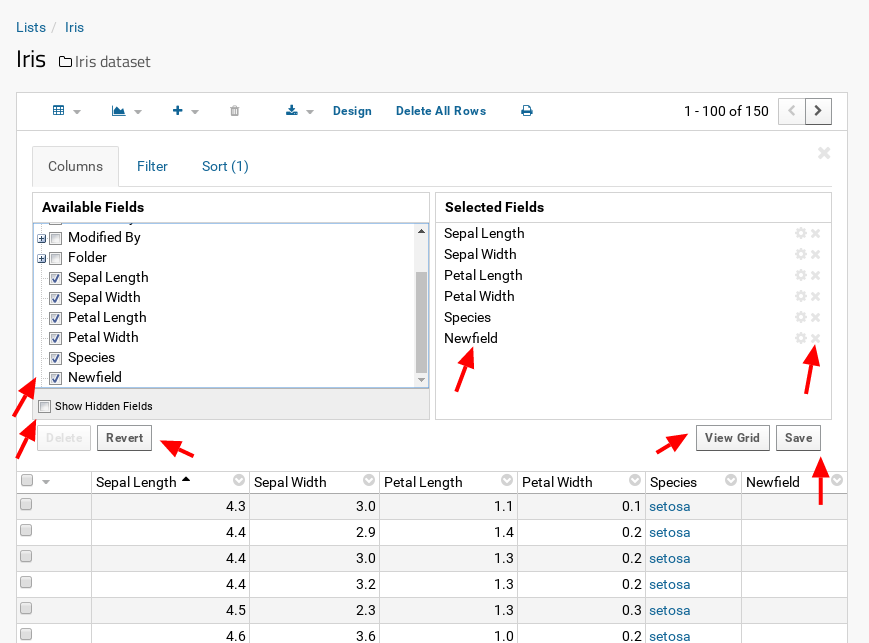
The fields can be placed in an upper or lower position by drag and drop in the "Selected Fields" panel.
They can also be removed from the view (but not from the table, so no data loss) by clicking on the cross icon in the "Selected Fields" panel.
- Click on the "View Grid" button, to inspect the resulting view.
The view can also be saved directly without inspecting, by clicking on the "Save" button, or discarded to undo any changes by clicking at the "Revert" button. - If "View Grid" button was chosen, click on the "Save" button to save the view, discard it by clicking on the "Revert" button, or continue editing the view by clicking on the "Edit" button.
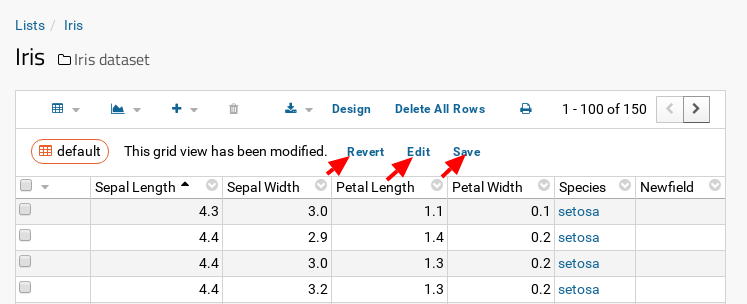
- To add pre-defined sorting and filtering to the view columns, check the LabKey documentation Saved Filters and Sorts.
How to restrict allowed values in a column?
Allowed values in a column can be configured by using validators. There are 3 types of validators:
- Regex Validators: for text, numerical and lookup columns
- Range Validators: for numerical and lookup columns
- Lookup Validators: for lookup columns
Once a validator has been added to a column, trying to insert a value which does not comply with the validator rule, will not be allowed and will show an error message.
Example: How to set up a regex validator
(the other types of validators are set in the same way)
- On the header of the table click "Design".
- Click "Edit Design".
- In the section "List Fields" select the corresponding field.
- Select the "Validators" tab and click on the button "Add RegEx Validator" to open a pop-up window.
 It might be necessary to scroll up the page to see the just opened validator pop-up window.
 - Add the regex pattern which should match the column values.
In this example:- Name: Gender Value Validator
- Regular Expression: M|F|M\?|F\?|NA|Juvenile
- Error Message: Please, enter one of the following values: M, F, M?, F?, Juvenile or NA
- Fail when pattern matches: No (unchecked)
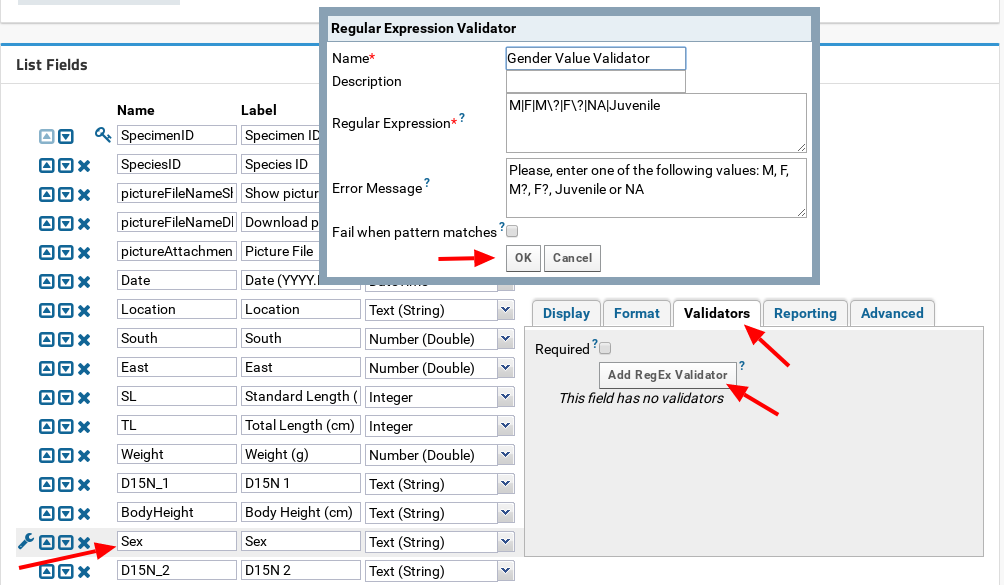
- Validate with "OK".
- Save the table design by clicking on the "Save" button on the top of the page.
- As a result, the field (in this example "Sex") will not accept any value which does not match the regular expression given.
What are "Missing Value Indicators"?
Missing Value Indicators (MVI) are useful in situations like:
- A field is of type boolean (True/False), and therefore not accepting "empty" or "null" values. MVI is an alternative to that.
- A field is of type number, but in the data files to import, the field has some times a string value (e.g. UNKNOWN, ---, etc...) indicating that the value is not present. To import those files, it is necessary to define those non-number values as MVI and configure the field to accept them.
- "Delete" some value temporarily and mark it for necessary quality control. Once quality is accepted, the field will be assigned automatically the "deactivated" value.
- Simply to highlight in the User Interface that a value is missing.
Missing Value Indicators have several uses:
- Allow for an alternative value to data which either do not have an available value, or have a non-allowed value type (e.g. the value is a string but the field is of type number, or the value is unknown but the field is a boolean and therefore allows only the values True or False).
- Allow deactivation of "suspect" values and assignment of a reason for its deactivation.
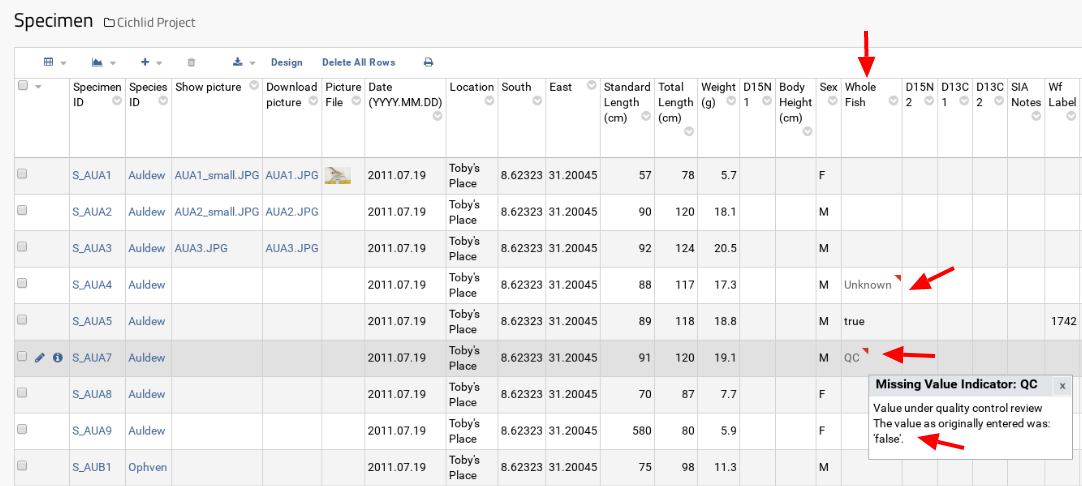
- Highlight MVI: they are marked with a red triangle on the upper right part of the value cell.
When a column contains a Missing Value, this is deactivated, i.e. its value will be kept in LabKey, but it will be missing in data exports.
E.g.: The field "WholeFish" is of type boolean. Activation of "Missing Value Indicators" for this field, makes it able to accept the available special value "Unknown" to indicate that the value is originally missing. On the table view it is shown having a red triangle:
How to set a field to allow "Missing Value Indicators"?
- On the header of the table click "Design".
- Click "Edit Design".
- In the section "List Fields" select the corresponding field.
- Select the "Advanced" tab and activate the "Missing Value Indicators" checkbox.
- Save the table design by clicking on the "Save" button on the top of the page.

How to change the values of "Missing Value Indicators"?
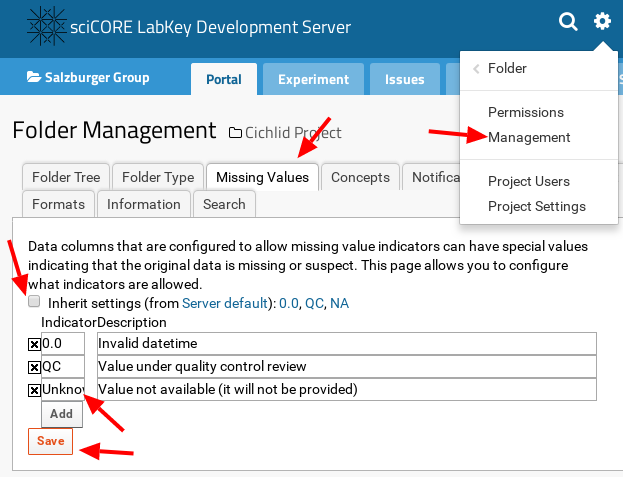
- Select the menu "
 --> Folder --> Management" on the top right-hand side of the page.
 - Select the "Missing Values" tab.
- If activated, deactivate the "Inherit settings" checkbox.
- Add new, remove or modify the text of existing indicators.
- Confirm by clicking the "Save" button.
How to download / upload images?
Download selected images (files)
- Select the "Files" web part.
- Select the folder where the images are stored.
- Select the files to download by checking them.
- Press the "Download" icon.
That will download a zip file with the selected contents.

Download a folder or folders
- Select the folder to download by checking it.
- Press the "Download" icon
That will download a zip file with the selected contents.
Upload
- By drag and drop:
-
- Select the files to upload in your File Browser.
- Drag and drop them on the "Files" web part.
- By using the menues:
-
- Click on the "Upload Files" button.
- Press the button "Browse" and select a file to upload. This option can only upload one file at a time.
- Proceed as indicated.
- By using a WebDAV client with the target repository's URL. Check the FAQ How to find out the URL of a directory or file? to get the URL.
More information about uploading files and directories through WebDAV in the LabKey documentation: Upload Files: WebDAV.
How to find out the URL of a directory or file?
There are several ways:
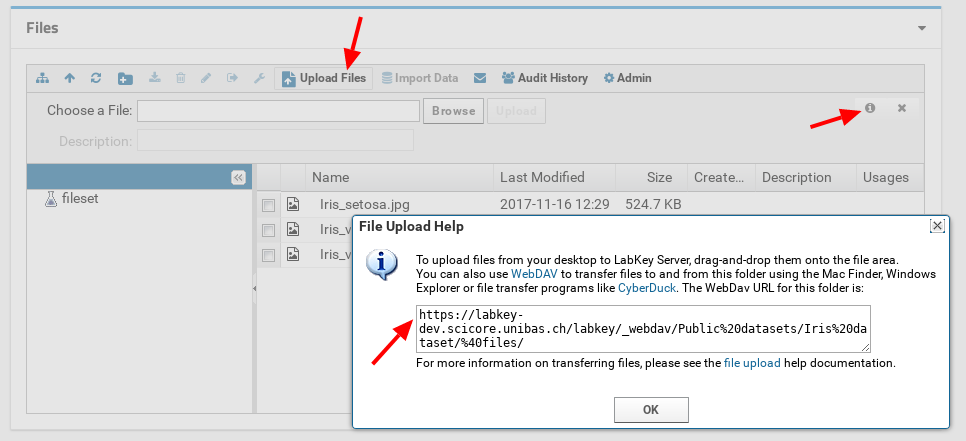
- Click at the information icon on the "Upload Files" menu of the "Files" web part.
For that, it is necessary first to click at the "Upload Files" button, and then the icon which will appear on the right-side.
This opens a pop-up window with the URL, which can then be copied.
- Check the WebDav URL appearing on the bottom of the "Manage Files" module.
To open the "Manage Files" module, select the menu " --> Go To Module --> FileContent" on the top right-hand side of the page.
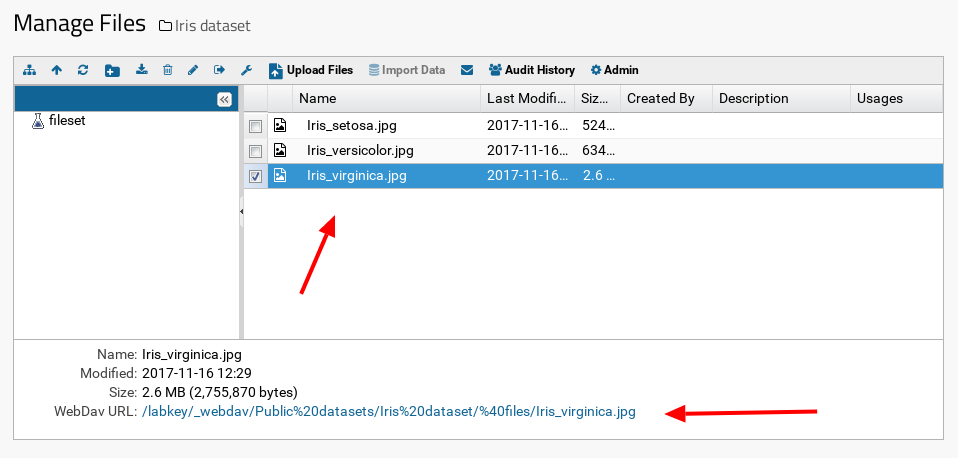
- Get the download link.
See the LabKey documentation "Share and View Files" on how to get this link.
How to link image files in a table to view / download them?
View
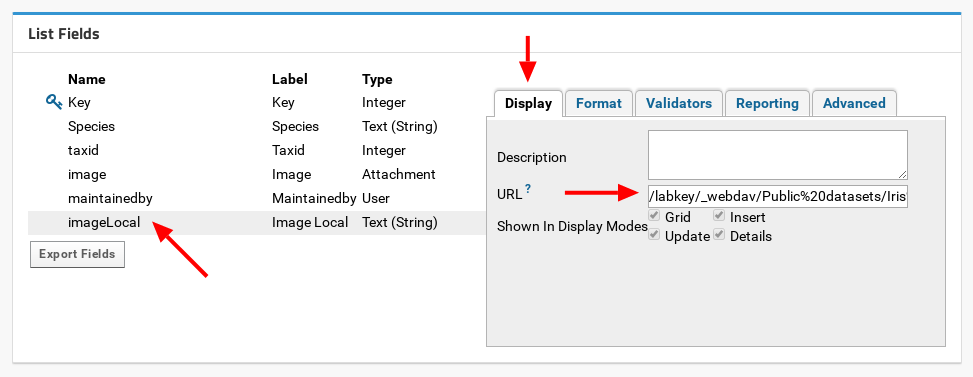
- Create a new column in the table of type "Text". In this example that is the field "imageLocal".
- Add in the "URL" input box of the field's "Display" tab, the path to the image file. E.g.
/labkey/_webdav/Public%20datasets/Iris%20dataset/%40files/${imageLocal}
This path consists of two parts: -
- Path to the directory containing the images. Check the FAQ "How to find out the URL of a directory or file?" for help on evaluating this path.
- Variable for the name of the file. The variable consists on the name of the column containing the file name surrounded by
${and}
Download
- Create a new column in the table of type "Text".
- Add in the "URL" input box of the field's "Display" tab, the path to the image file. E.g.
/labkey/_webdav/Public%20datasets/Iris%20dataset/%40files/${imageLocal}?contentDisposition=attachment
This path consists of three parts: -
- Path to the directory containing the images. Check the FAQ "How to find out the URL of a directory or file?" for help on evaluating this path.
- Variable for the name of the file. The variable consists on the name of the column containing the file name surrounded by
${and} - Query string to trigger a download:
?contentDisposition=attachment
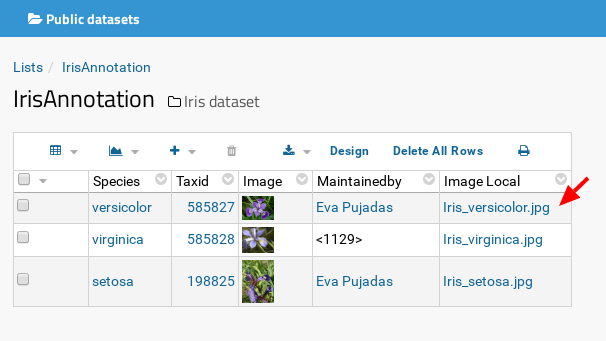
In both cases, the field which contains the URL needs to be populated with the name of the file to view or download (e.g. "Iris_versicolor.jpg").
When clicking on the file link, the image will be displayed or downloaded.
How to use "Labels" and "Descriptions" in a column?
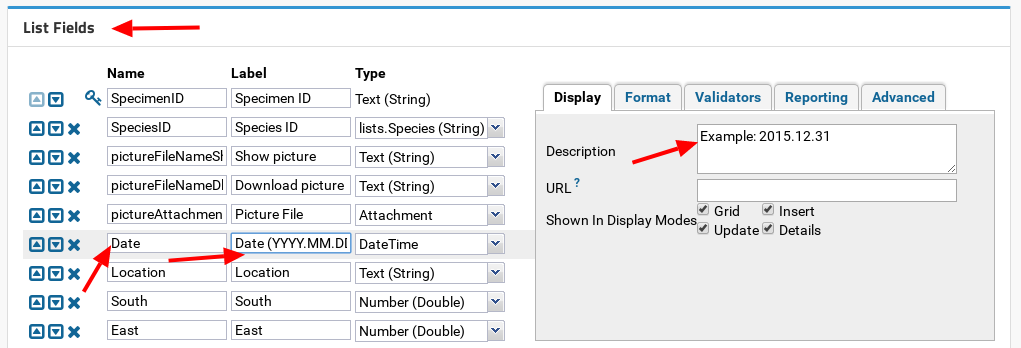
Each column in a table can have a "Label", which will be shown as the table column header, and a "Description".
- On the header of the table click "Design".
- Click "Edit Design".
- In the section "List Fields" select the corresponding field.
- Label:
-
- Enter the label text in the "Label" text box.
- Description:
-
- Select the "Display" tab on the right side of the panel.
- Enter the description text in the "Description" text box.
- Save the changes by clicking the "Save" button on the top of the page.
- The label will appear as header in the view column, and the description in the tooltip.
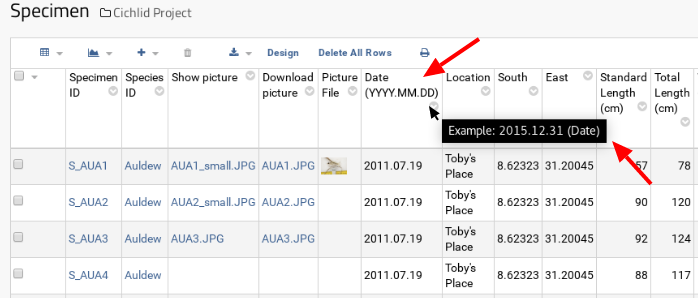
- When inserting a new record, the label will appear as input label and the description as tooltip.
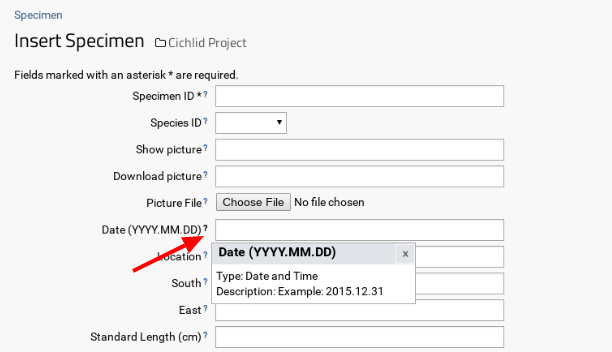
 The label can also be used as column name in data files to import. See the FAQ How to populate an existing table with data from a file? for more information on this subject.
What are conditionally formated a fields?
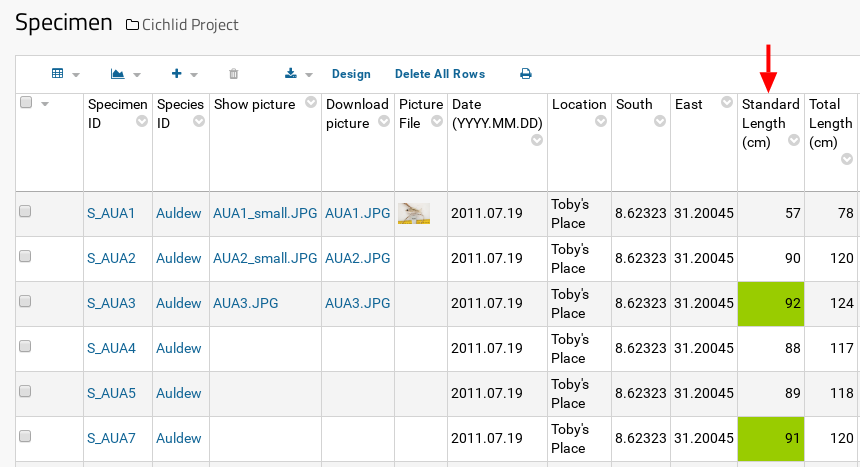
Values display on a column can be changed in different ways: bold, italics, color, background's color, etc.. depending on the value.
Below an example, where it can be seen that the field "Standard Length" has been formatted to show its background green when the value is greater than 90:
How to conditionally format a field?
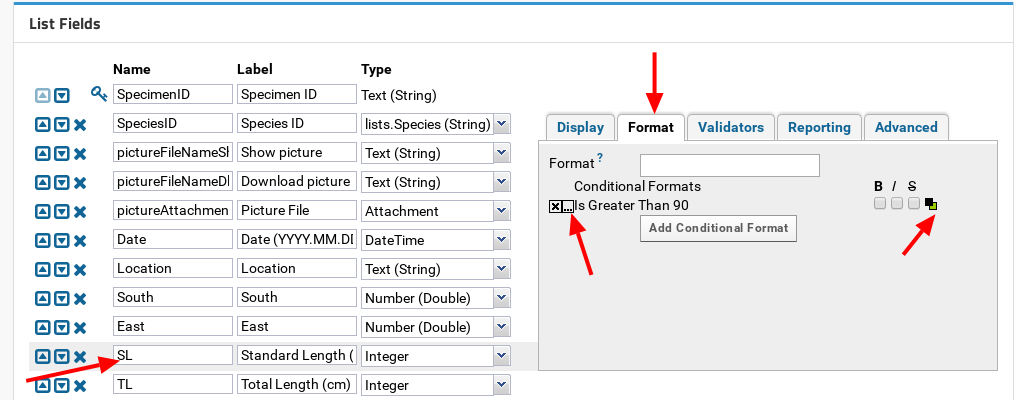
- On the header of the table click "Design".
- Click "Edit Design".
- In the section "List Fields" select the corresponding field.
- Select the "Format" tab and click the "Add Conditional Format" button.
- Enter the filter type and its value.
- On the right side of the format, activate the checkboxes for bold (B), italics (I), strike-through (S) and / or select a color (for font or background).
- Save the changes by clicking the "SAVE" button on the top of the page.
Queries
| How can I create a query from one or several lists? |
| How can I edit an existing query? |
| How can I create a view from a query or "Query Report"? |
| How can I delete a "Query Report"? |
How can I create a query from one or several lists?
- Select the menu "
 --> Go To Module --> Query" on the top right-hand side of the page.
 - In the "Query Schema Browser" select the list to be included in the query.
- Click the "Create New Query" button.
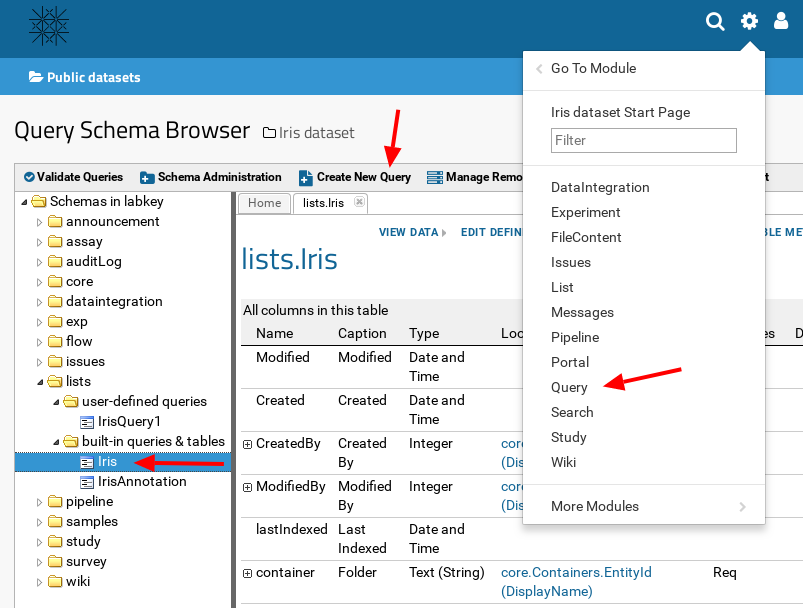
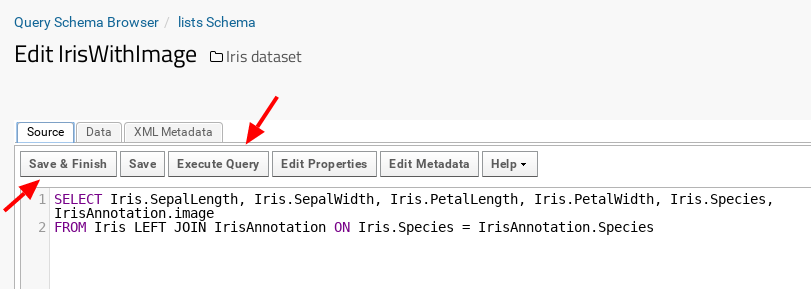
- Introduce a name for the new query and click the button "Create And Edit Source".
- Edit the SQL statements.
SQL results can be viewed by clicking the "Execute Query" button. - Save the query using the "Save & Finish" or "Save" button.
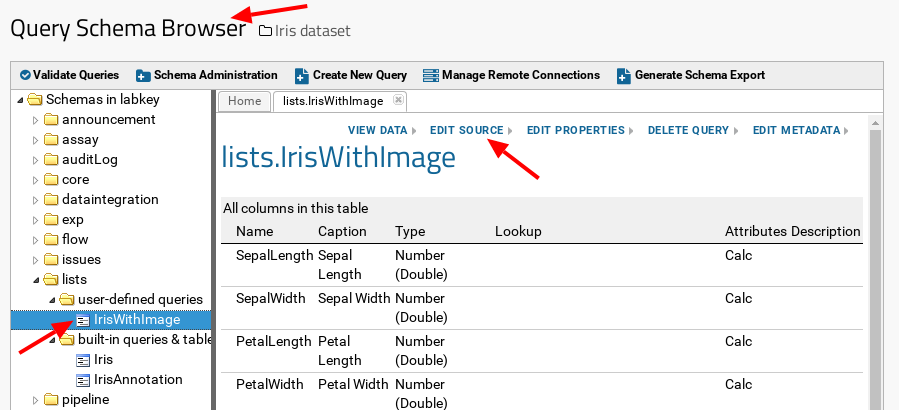
How can I edit an existing query?
- Select the menu "
 --> Go To Module --> Query" on the top right-hand side of the page.
 - In the "Query Schema Browser" select the user-defined query to edit.
- Click the "EDIT SOURCE" link.
- Edit the SQL statements.
SQL results can be viewed by clicking the "Execute Query" button. - Save the query using the "Save & Finish" or "Save" button.
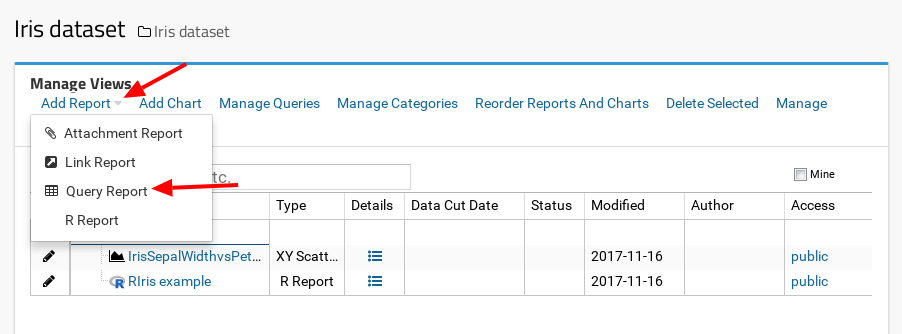
How can I create a view from a query or "Query Report"?
- Select the menu "
 --> Manage Views" on the top right-hand side of the page.
 - From the "Add Report" menu, select "Query Report".
- Introduce a name for the new view.
- Select schema, query and default view from the dropdown boxes.
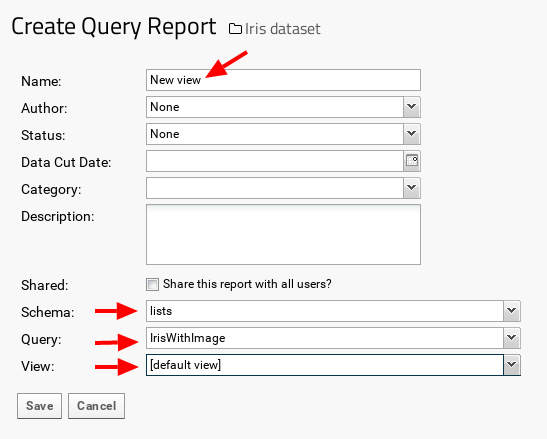
- Confirm clicking the button "Save".
- The new view will appear in the list of views, which can be accessed, for example, from the menu "
 --> Manage Views" on the top right-hand side of the page.
How can I delete a "Query Report"?
- Select the menu "
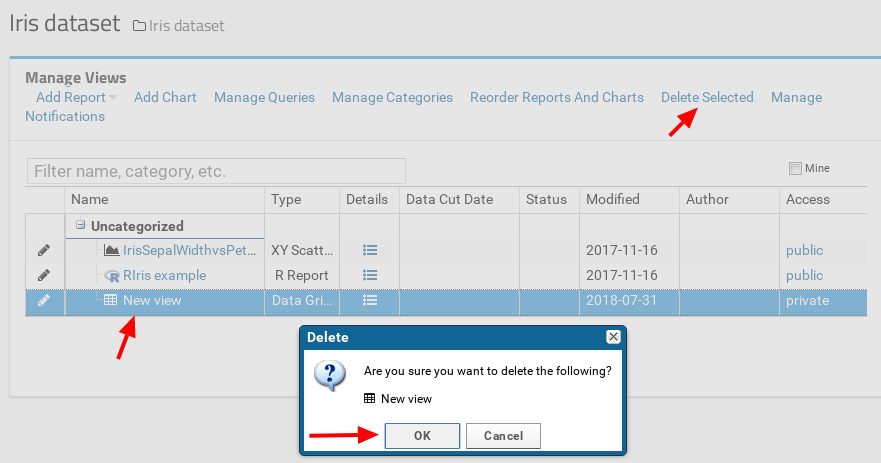
 --> Manage Views" on the top right-hand side of the page.
 - Select the view or views to delete and click the button "Delete Selected".
- Confirm by clicking the "OK" button on the "Delete" window.
User Administration
| How to create a new project group? |
| How to create a new user in an existing project group? |
| How to test a new user or group? |
| How to add / remove permissions to users and groups? |
How to create a new project group?
 Check what is understood under "project" in LabKey.
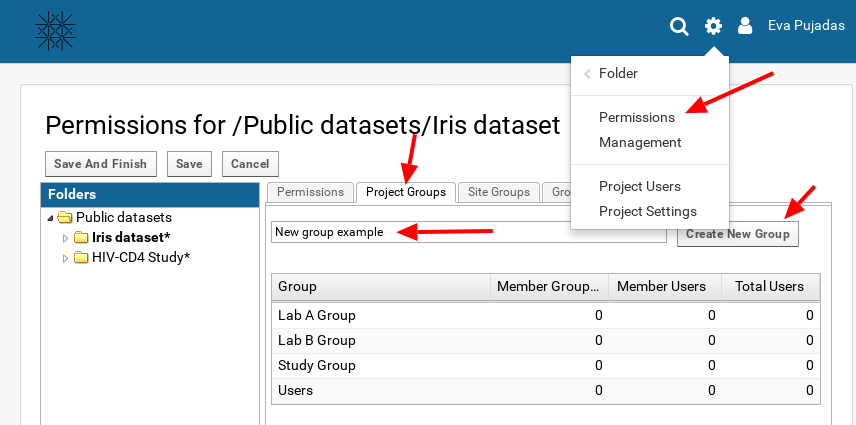
- Select the menu "
 --> Folder --> Permissions" on the top right-hand side of the page.
 - Select the tab "Project Groups".
- Enter the name of the new group. E.g. "New group example".
- Click on "Create New Group" button.
How to create a new user in an existing project group?
 Check what is understood under "project" in LabKey.
- Select the menu "
 --> Folder --> Permissions" on the top right-hand side of the page.
 - Select the tab "Project Groups".
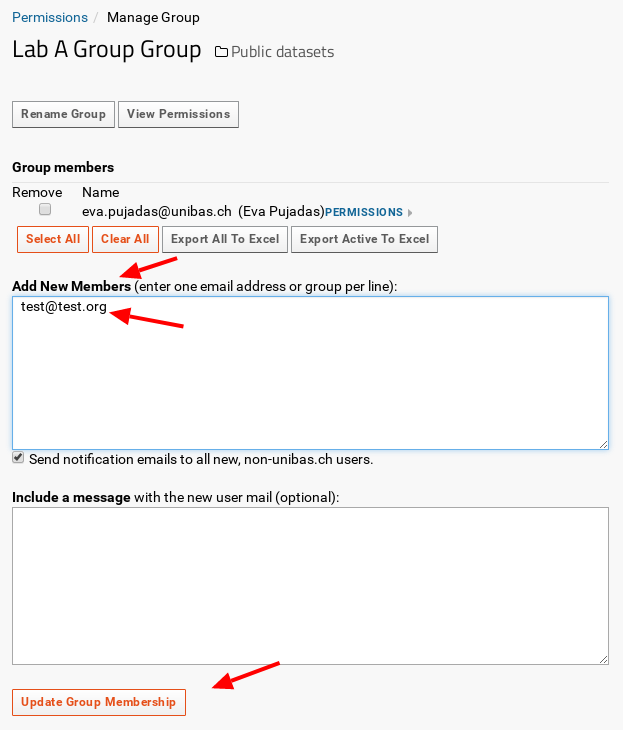
- Click on the corresponding project group to open a pop-up window, e.g. "Lab A Group".
- On the pop-up window, click on "MANAGE GROUP".
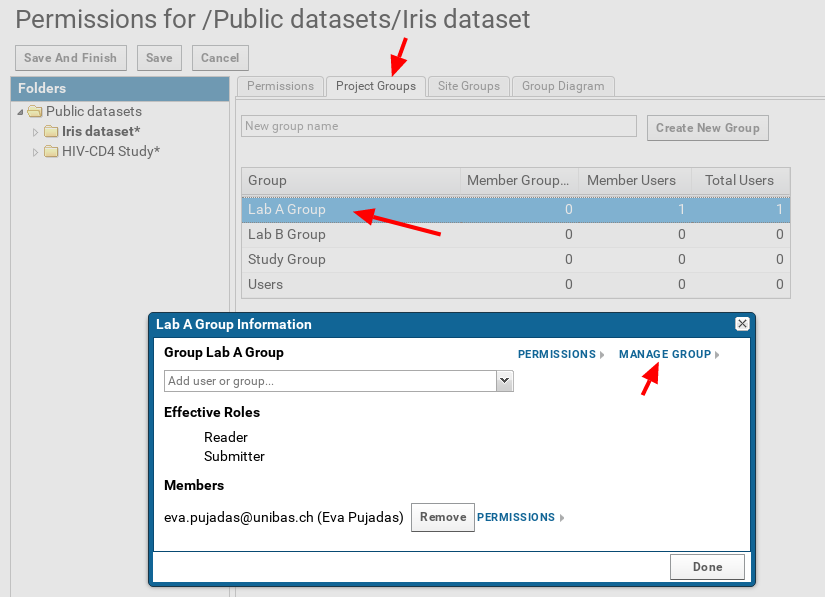
- In the input box "Add New Members" enter the e-mail address of the new user or users to create.
- Click on the "Update Group Membership" button.
How to test a new user or group?
A site or project administrator can test security settings by impersonating a user, group, or role.
- Select the menu "
 --> Impersonate" on the top right-hand side of the page.
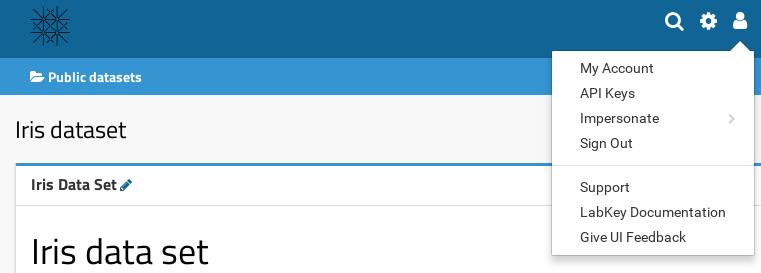
- Choose a user, group or role to test for security settings.
- Once finished with testing, stop impersonating by clicking on the button "Stop Impersonating" on the top right-hand side of the page.

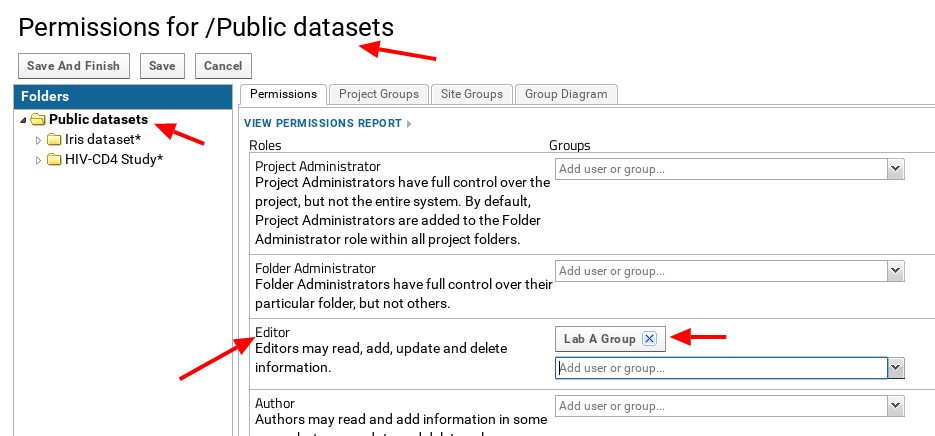
How to add / remove permissions to users and groups?
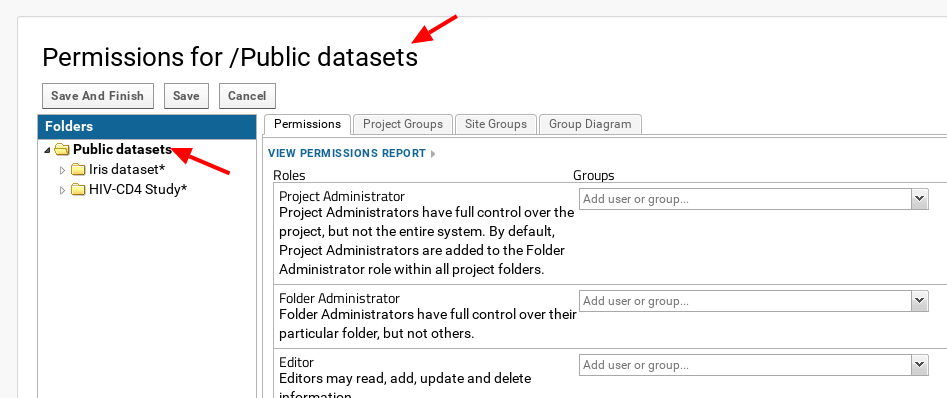
- Select the menu "
 --> Folder --> Permissions" on the top right-hand side of the page.
 - Select the tab "Permissions".
- On the left-hand side "Folders" tree, select the folder where to apply the permissions
Since sub-folders can be set to inherit the permissions of its parent folder, it is practical to set common permissions for all folders from the root / parent folder, and then adapt them in each sub-folder.
Adding permissions
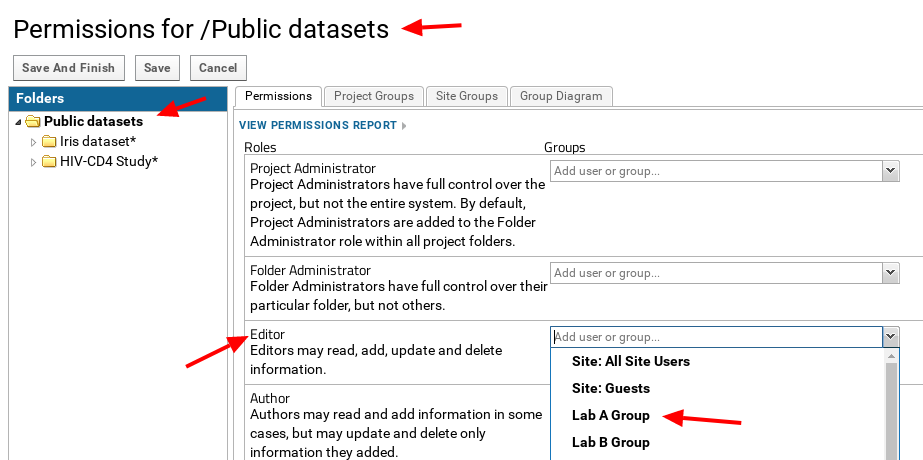
- Select in the corresponding role dropbox, the users and /or groups to whom the role (set of permissions) is to be granted.
- Save the changes using the "Save And Finish" or "Save" button.
Removing permissions
- Click on the cross icon next to the user or group from whom the role (set of permissions) is to be revoked.
- Save the changes using the "Save And Finish" or "Save" button.
Data Protection
| How to handle Protected Health Information (PHI)? |
| How do I set a field as PHI? |
| How do I remove PHI fields from folder exports? |
How to handle Protected Health Information (PHI)?
The list columns (list fields), can be optionally tagged as containing some level of PHI (Protected Health Information).
PHI field tagging will allow to include or remove the columns from a folder export, based on the level of protection.
- Not PHI (default): not protected
- Limited PHI
- Full PHI
- Restricted: for the most sensitive categories of data
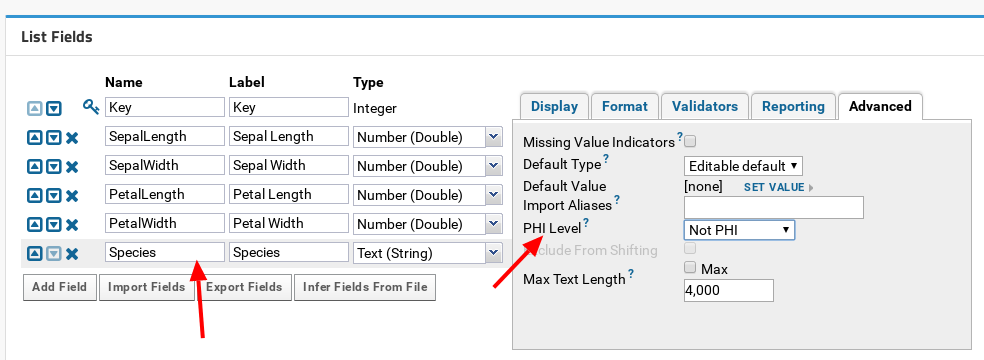
How do I set a field as PHI?
- On the header of the table click "Design".
- Click "Edit Design".
- In the section "List Fields" select the corresponding field.
- Select the "Advanced" tab and choose the "PHI Level" from the dropdown box
- Save the table design by clicking on the "Save" button on the top of the page.
As a result, the field (column) will optionally be excluded from folder exports (see How do I remove PHI fields from folder exports?).
How do I remove PHI fields from folder exports?
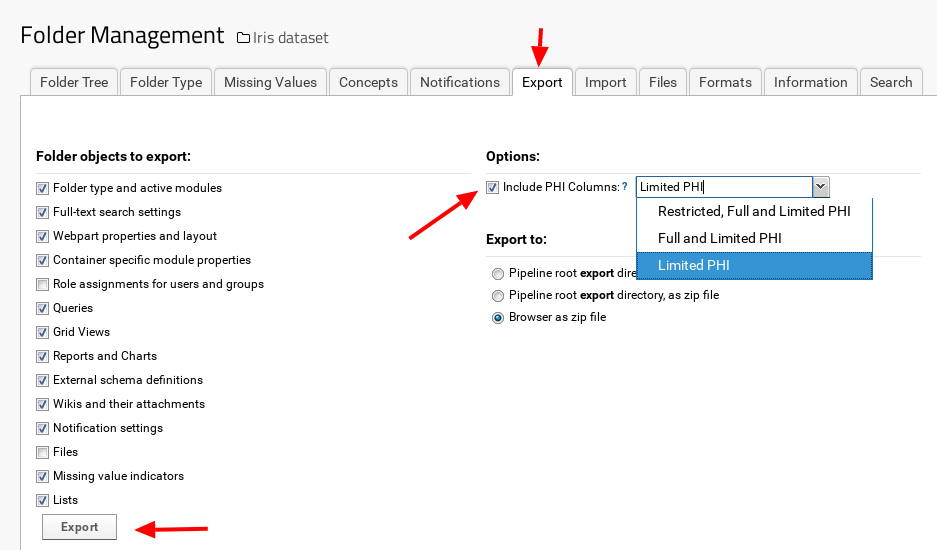
To optionally remove a PHI column in a folder export:
- Select the menu "
 --> Folder --> Management" on the top right-hand side of the page.
 - Select the "Export" tab.
- Deactivate the checkbox "Include PHI Columns:" to remove any field marked as PHI, or activate it and select the level of PHI to include all the fields tagged with this level or below.
- Select the objects to export and hit the button "Export".
Message Board
| What is a messages board? |
| How can I link a record in a table with a message? |
What is a messages board?
A message board gives a way to post messages for discussion.
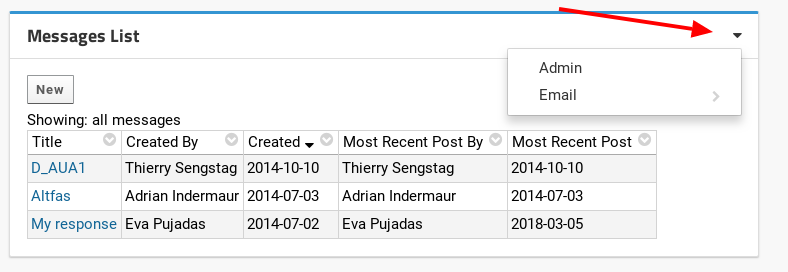
Users can be notified by e-mail when new messages are created and/or answered. This and other features can be configured by expanding the menu placed next to the "Messages List" web part title.
Messages can also be linked to records in a list (see below).
A message board can be added to any page as a web part. For details about how to add a web part, check the FAQ How to change the contents of a page?.
How can I link a record in a table with a message?
- Go to the "Design" menu of the table whose entries should be linked with messages.
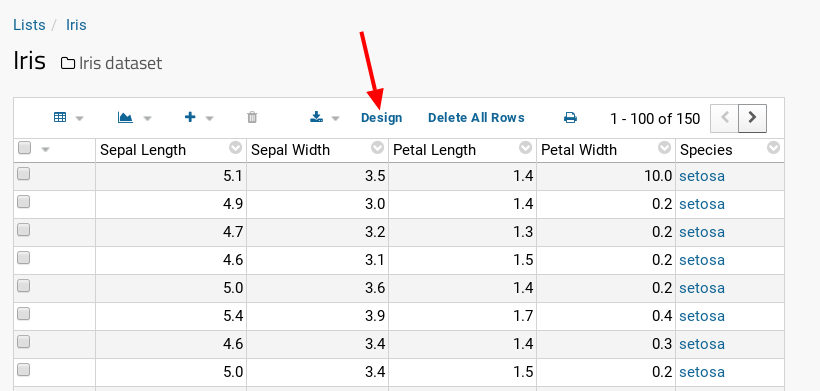
- Click on "Edit Design"
- In the "List Properties" section, "Discussion Links" sub-section, enable one of the two possibilities "Allow one discussion per item" or "Allow multiple discussions per item".
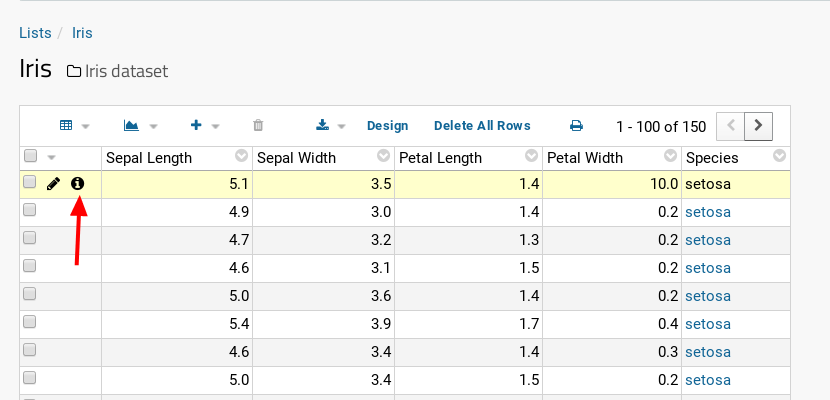
- That will allow to add messages to single records when viewing them, by clicking at the "details" icon.
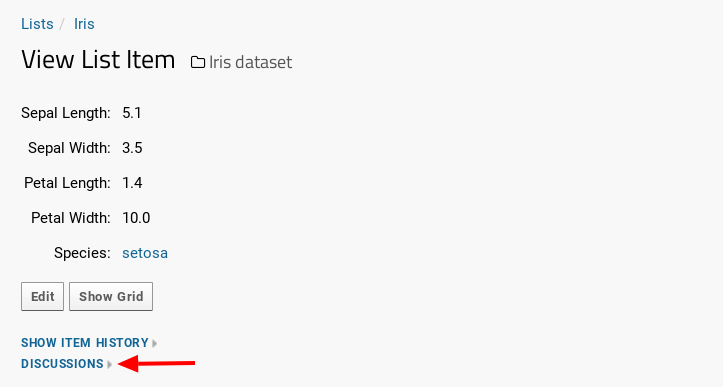
- To start a discussion, click the "DISCUSSIONS" link. The created messages will appear in the message board.
Surveys
How to create a survey?
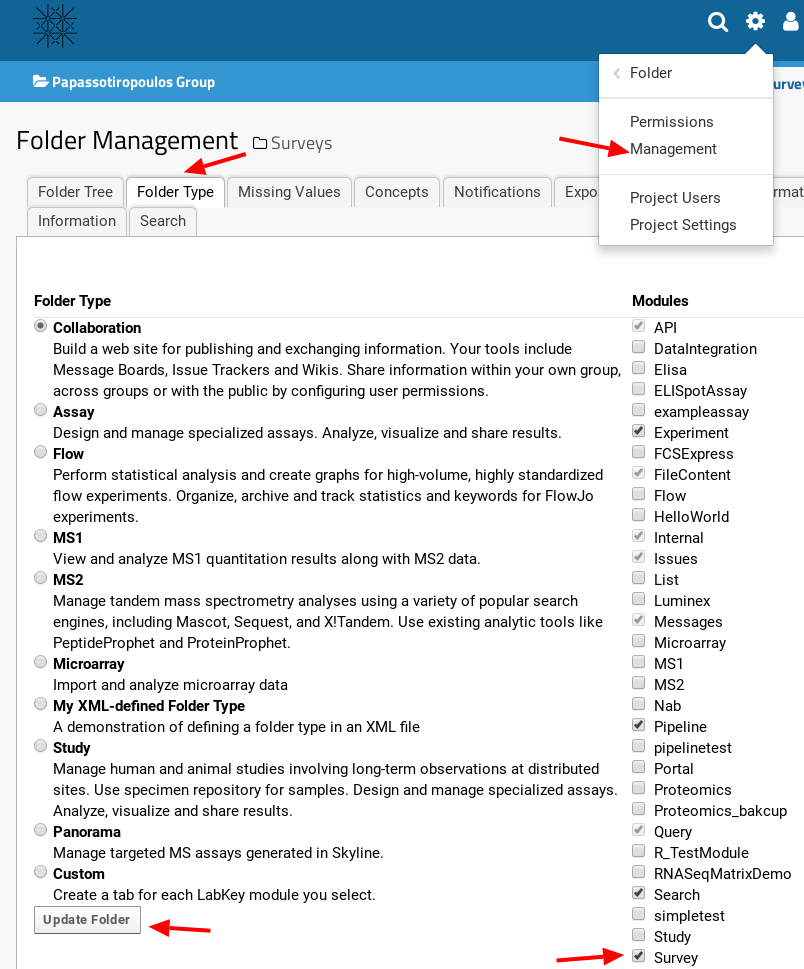
(1) Enable the "Survey" module in the folder where the survey is to be created
- Select the menu "
 --> Folder --> Management" on the top right-hand side of the page.
 - Select the tab "Folder Type".
- Select the "Survey" module.
- Confirm by clicking at the "Update Folder" button.
(2) Ensure that you have a table where to store the survey data
- A table can be created in the menu "
 --> Manage Lists" on the top right-hand side of the page.
 - Click at the "Create New List" button.
- If needed, check the LabKey documentation on how to create a simple list manually: Manually Define Fields.
Or check the FAQs on how to create a list from an existing data file: How to create a table importing from a file?
(3) Create a "Survey Design"
- In the "Survey Designs" Web Part, click at "Create Survey Design".
 To select a Web Part, enter into "Admin Mode" by selecting "
 --> Page Admin Mode". More details in the FAQ How to change the contents of a page?

- In the "Schema" dropdown box, choose "lists".
- In the "Query" dropdown box, choose the table where to store the survey data.
- Give a name and a description.
- Click the "Generate Survey Questions" button. That will generate a survey based on the field names of the chosen survey table.
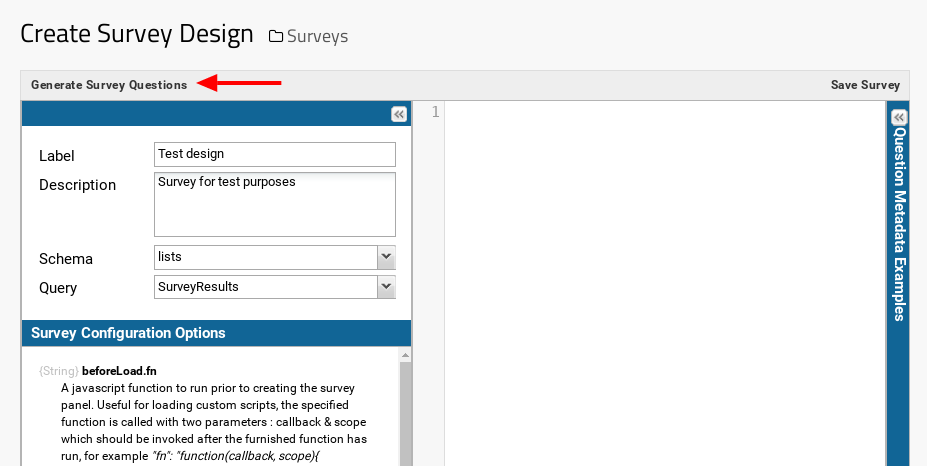
- Adapt the proposed survey design as required. Some JSON code snippets can be extracted from the "Question Metadata Examples".
- Click the "Save Survey" button.
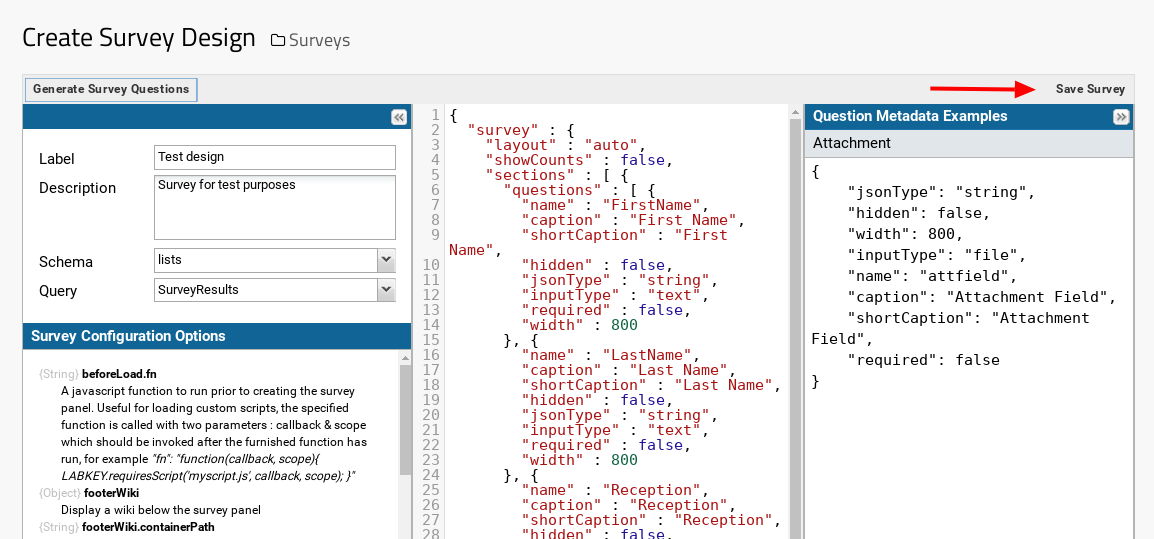
For further information, see Survey Designer: Customisation from the LabKey documentation.
(4) Fill out the survey
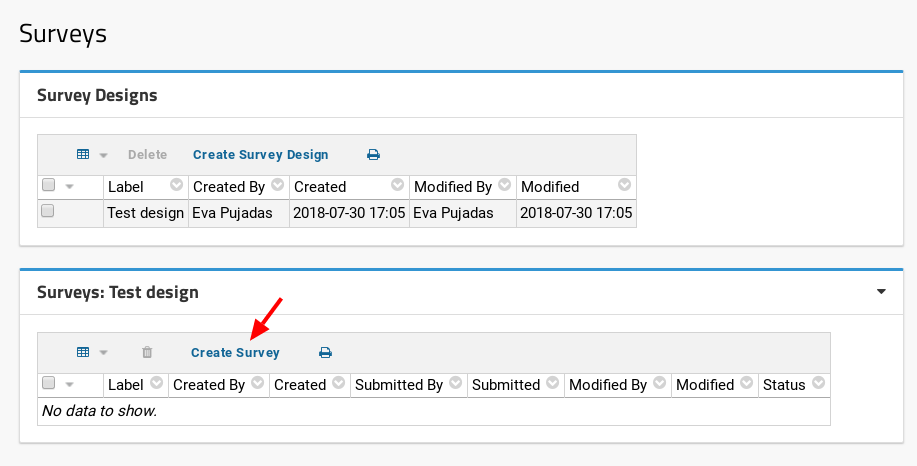
- Add a "Surveys" web part with the previously created survey design "Test design".
If necessary, check the FAQ How to change the contents of a page? to see how to add a web part. - Click on the button "Create Survey" of the "Surveys" web part to start to populate a new survey instance.
Formats
| Date parsing formats |
| Date display formats |
| Formats reference |
Date parsing formats
Date parsing defines how LabKey interprets user-entered dates, to store the date value.
It allows to define two parsing formats:
- US parsing (MDY): Month + Day + Year
- Non-Us parsing (DMY): Day + Month + Year <---- this is the currently active format in this site
Example:
There are dates which could be ambiguous.
If user enters "10-4-80" or "10/4/80", it will be interpreted in different forms depending on the parsing format set:
| Parsing Format | Date stored |
| US parsing | 4th October 1980 |
| Non-Us parsing | 10th April 1980 |
Date parsing format can only be set globally, at site level by a site admin, and affects all the projects.
Note:
LabKey date parser does not recognize time-only entered strings.
This means that you need to enter a full date string even when you wish to display time only.
For example, you might enter a value of "2/2/09 4:00 PM" in order to display "04 PM" when using the format string "hh aa".
Date display formats
Date display defines how LabKey shows dates in views, independently of the format used to enter the date.
Example:
If user enters "25-5-15 13:05", it will be shown in different ways depending on the display format set:
| Display Format String | Date displayed |
| dd-MMM-yyyy HH:mm | 25-May-2015 13:05 |
| dd-MM-yyyy HH:mm | 25-05-2015 13:05 |
| d-M-yyyy H:m | 25-5-2015 13:5 |
| dd-MMM-yyyy hh:mm a | 25-May-2015 01:05 PM |
Date display format can be set at several levels:
- globally, applying to the whole site
- at the project level, in menu "Admin ---> Folder --> Project Settings --> Default display format for dates"
- on a per-field basis: view the list (or dataset), "View Design --> Edit Design" (or "Manage Dataset --> Edit Definition"), select the field to format, add the format string in the "Format" tab.
Attention!!
Display formats have no effect when editing dates. In edit form, the dates are always shown with format yyyy-MM-dd HH:mm, but need to be entered in parsing format.
Formats reference
See the LabKey documentation page Date and Number Formats Reference.
Folder Management
| How to export a folder? |
| How to import a folder? |
| What should I take into account when exporting a folder? |
How to export a folder?
- Navigate to the folder you wish to export.
- Select the menu "
 --> Folder --> Management" on the top right-hand side of the page.
 - Select the tab "Export".
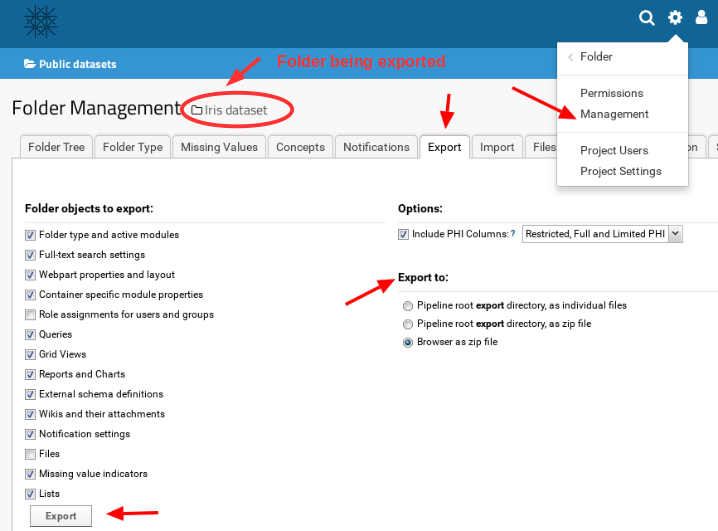
 Make sure you selected the correct folder by checking the folder name in the title. E.g. in the screenshot below, the folder to export is "Iris dataset".
 - Activate the checkboxes of the objects to export.
- Select the type of export, e.g. as a Zip file.
- Click on the button "Export".
How to import a folder?
A LabKey folder can be imported:
-
in an already existing folder:
In this case, the already existing data in this folder will be deleted and substituted by the imported data.
 It is not possible to recover the previous overwritten data.
 Make a backup of the folder by exporting its contents in a zip file, before importing the new folder.
-
into a new folder:
It is necessary to create the new folder before importing, since the import process will not create this folder.
The new folder does not need to be configured (e.g. for folder type) since its properties will be obtained from the files to import.
How to import a folder:
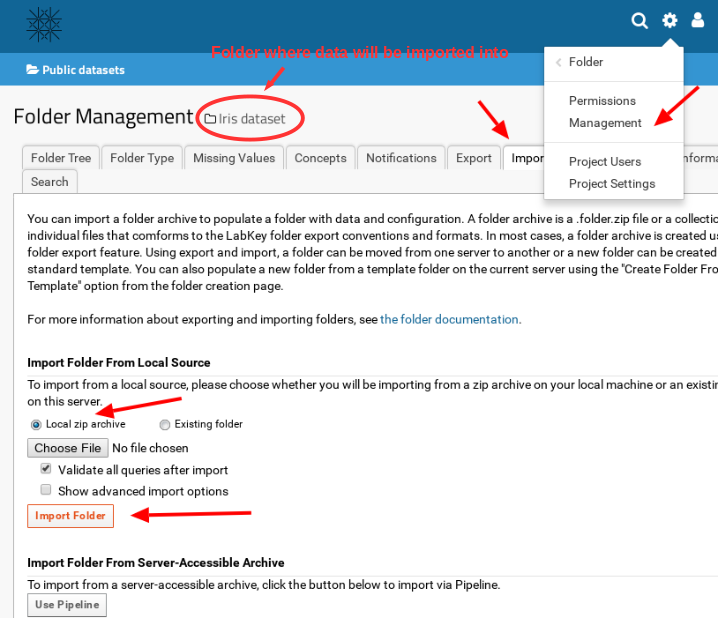
- Navigate to the folder you wish to import. In case the folder does not exist, first create the folder (see point 2 above).
- Select the menu "
 --> Folder --> Management" on the top right-hand side of the page.
 - Select the tab "Import".
 Make sure you selected the correct folder by checking the folder name in the title. If the selected folder is not correct, importing will overwrite it and its content will be lost. E.g. in the screenshot below, the folder where the data will be imported is "Iris dataset".
 - Select the zip file to import (local or in the server) and click the "Import Folder" button.
What should I take into account when exporting a folder?
- Some features are not included in the export:
-
- list validators
- default values
See this LabKey Forum Message for more information
- Permission settings (groups and roles) export is possible, but users (identified by e-mail) must already exist in the target system.
As an alternative, creation of groups and role assignment can be done by hand. - Views, to be exported, need to be made "public". Once imported, they can be made "private" again.
- Files need to be separately downloaded from the source system and uploaded to the target system.
- Messages are not exported.
- Issues are not exported.
- Other?
APIs
Rlabkey API
| What is Rlabkey? |
| How do I set credentials to access LabKey data from my local machine? |
| How do I use the API? |
| Where can I get more documentation about Rlabkey? |
What is Rlabkey?
It is an API which makes it easy for R users to load live data from a LabKey Server into the R environment.
Features of Rlabkey:
- user must have appropriate permissions
- user credentials are obtained from a separate location than the running R program
- records stored on a LabKey Server can be:
- read
- inserted
- updated
- deleted
- it uses HTTP requests to communicate with a LabKey Server
How do I set credentials to access LabKey data from my local machine?
Please, check the FAQ Security for details about setting credentials.
How do I use the API?
Install the "Rlabkey" package in the host from which one needs to access the remote LabKey data using the following command from the R console:
> install.packages("Rlabkey")
Load the "Rlabkey" library at the start of every R script or in the R console using the following command:
> library(Rlabkey)
Example of accessing the content of a list, using the method "labkey.selectRows()" in the R console:
> rows <- labkey.selectRows(baseUrl="https://labkey.scicore.unibas.ch/labkey", folderPath="Public datasets/Iris dataset",schemaName="lists", queryName="Iris")
Where can I get more documentation about Rlabkey?
- List of available methods in the Rlabkey package: Rlabkey documentation (pdf)
- Use the R command "
RlabkeyUsersGuide()" to download the "Rlabkey Users Guide". - LabKey documentation in Rlabkey Package.
Python API
| What is LabKey's Python API? |
| How do I set credentials to access LabKey data from my local machine? |
| How do I install the API? |
| How do I use the API? |
| Where can I get more examples of the API's usage? |
What is LabKey's Python API?
It is an API which allows to query, insert and update data on a LabKey Server from Python, plus programmatically update wikis and post to message boards.
How do I set credentials to access LabKey data from my local machine?
Please, check the FAQ Security for details about setting credentials.
How do I install the API?
Install the library in the host from which you need to access the remote LabKey data using the following command from the shell:
$ pip install labkey
More information in the GitHub's project labkey-api-python and in the Python Package Index PyPI labkey.
How do I use the API?
Example of accessing the content of the list "Iris" in schema "lists" of project "Public datasets / Iris dataset", using the method "select_rows()" in the Python console:
>>> from labkey.api_wrapper import APIWrapper
>>> server_context = APIWrapper('labkey-collab.scicore.unibas.ch', 'Public datasets/Iris dataset', '', use_ssl = True)
>>> result = server_context.query.select_rows('lists','Iris')
>>> print(result['rows'][0]['SepalLength'])
5.4
More information in the GitHub's project labkey-api-python.
Where can I get more examples of the API's usage?
In the LabKey GitHub repositories:
Toy example: test_api_filter.py
Security
How do I create a .netrc or _netrc file?
Create a file named ".netrc" ("_netrc" on Windows) in your home directory.
This file must include the following 3 lines:
machine <remote-instance-of-labkey-server>
login <user-email>
password <user-password>
E.g.:
machine labkey.scicore.unibas.ch
login eva.pujadas@unibas.ch
password xxxxx
The row "machine" denotes either the IP-address or the name of the server running the Labkey instance (the example could contain the IP-address of the "labkey.scicore.unibas.ch" server instead).
 Note that you must not include "https://" or the port number (e.g. "127.0.0.1:8080") here.
The row "login" describes a valid user name for the Labkey instance. Rlabkey can access every content that the particular user has been granted permission for.
The row "password" contains the valid password of the above user for the Labkey instance.
More details in LabKey documentation Create a .netrc or _netrc file.
How do I secure the credentials file?
Two proposals:
(1) Set file permissions
Set the permissions of this file to only read for the user, that no one can see that file other than you.$ chmod 400 .netrc
(2) Encrypt
For more security, encrypt the file using PGP, for example.
Encrypt with:
$ gpg -c .netrc
 Be sure to delete the original file after creating the encrypted version. Otherwise, there is no protection.
 Be sure to remember keys or passphrases. There is no recovery.
And decrypt with:
$ gpg .netrc.gpg
 There is no need to give the passphrase when decrypting in the same environment where the file was encrypted.
How is the credentials file accessed?
LabKey APIs will automatically access the credentials stored in the credential file, given the file is located in the right place, that is, in your home directory.
Can you give more details on Windows?
How should I create the _netrc file?
Use a text editor (e.g. TextWrangler) to create the "_netrc" file and save it as "_netrc" (without file extension such as ".txt" or the like).
Where should I store the _netrc file?
The "_netrc" file should be located in the home-directory of the computer that accesses Labkey via the APIs.
This requires you to create an environment variable containing the path to your home-directory. For more details on environment variables see this page.
What is an API key?
An API key is a long, randomly generated token that provides an alternative authentication credential for use with APIs.
API keys have security benefits over passwords:
- they are used to authenticate to a sever, avoiding the use and storage of a LabKey password on the client machine.
- they are tied to a specific server.
- they can be configured to expire.
- they can be revoked.
But since a valid API key provides complete access to your data and actions, it should be kept secret.
The API key can be used in several ways:
- specifying the key in the ".netrc" (or "_netrc") file. E.g.:
machine labkey.scicore.unibas.ch
login apikey
password apikey|the_rest_of_the_long_api_key_copied
- providing it to API functions.
- using it with external clients that support Basic authentication.
More details can be found in the LabKey documentation API Keys.
How can I create an API key?
- Select the menu "
 --> API Keys" on the top right-hand side of the page.
 - Click the button "Generate API Key".
- To grab the key, click the button "Copy to Clipboard". The button will read "Copied!" when the copy has completed.
- Finalize by clicking the button "Done".
How to disable validation of self-signed SSL certificates?
If you are using a self-signed certificate, and connecting via HTTPS on a Mac or Linux machine, you may see issues as labkey attempts unsuccessfully to validate that certificate.
Validation can be disabled in the following way:
In Rlabkey
To bypass the peer and host verification steps, add the following to your script:
> labkey.setCurlOptions(ssl_verifyhost=FALSE,ssl_verifypeer=FALSE)
More information in LabKey documentation Troubleshooting Rlabkey Connections.
In Python
To bypass the SSL verification step, add the parameter "use_ssl" with value "False" when creating the server context. E.g.:
server_context = create_server_context('labkey.scicore.unibas.ch', 'Public datasets/Iris dataset', 'labkey', use_ssl = False)
LabKey releases compatibility issues
Backwards compatibility issues in release 19.1 (March 1919)
Remote API date format change
The date format in JSON responses has been changed to include milliseconds: yyyy-MM-dd HH:mm:ss.SSS
In previous releases the following format was used: yyyy/MM/dd HH:mm:ss
Due to this, JavaScript and Python queries will use dates in those formats.
As an example, a select query will return:
-
2011-07-19 00:00:00.000(version >= 19.1)
instead of:
-
2011/07/19 00:00:00(version < 19.1)
Further infos in: Release Notes 19.1.x, chapter "Potential Backwards Compatibility Issues".
Fix: Adapt Python API scripts to the new date format. Since there is no milliseconds format directive, one solution would be to use the microseconds directive (%f)'%Y-%m-%d %H:%M:%S.%f', and remove the last 3 digits.
New UI
New User Interface
From version 17.3 (December 14, 2017), LabKey redesigns its user interface (UI). With the 17.3 release, all installs will be moved to the new interface and the old UI will no longer be available for use.
Key priorities of the new UI:
- Evolve LabKey platform to utilize modern technologies and interaction patterns
- Respond to user feedback
Purpose:
- usability
- optimize for the Modern Lab by designing for the smallest screen-size (e.g. tablets)
Main updates:
- look and feel
- interface behavior
- technical stability
Key changes:
New menu "Page Admin Mode" for page edits:
Some options, like "Select Web Part” and "Tab editing", will only be visible when "Page Admin Mode" is turned on. The option stays active until the user deactivates it by clicking on "Exit Admin Mode".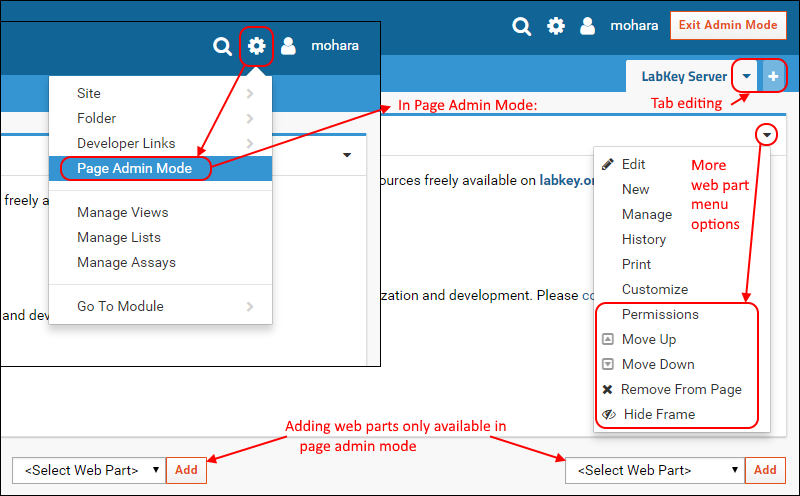
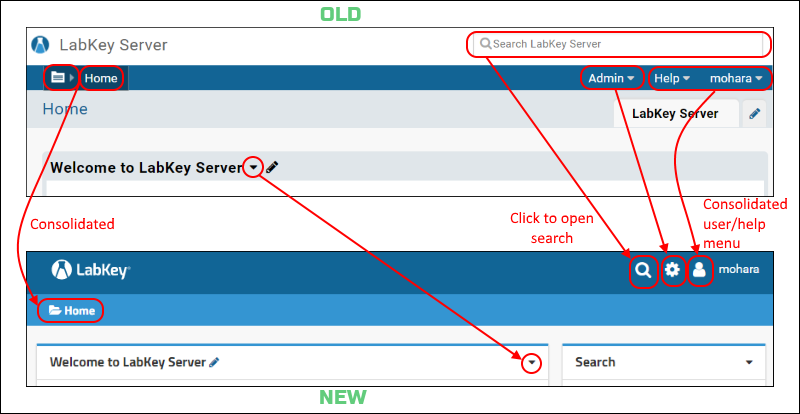
Headers and menues:
- The project and folder menus have been combined into one.
- Web part pulldown menus are now available in the upper right of a web part, rather than attached to the name.
- The search bar is only shown when you click the
 icon.
icon. - The admin menu can now be accessed via the
 menu.
menu. - The help and username menus have been consolidated under the
 menu.
menu. - Some hover and click actions have been changed to better match user expectation.
- Navigating to 2nd and 3rd level submenus (e.g. in the admin menu) is done in one menu frame instead of several, and requires to click to navigate to a submenu: Menus show
 icons to indicate a submenu or parent menu is present.
Data grids
More graphical and intuitive grid layout making it easier to page through, manage, and interpret your data.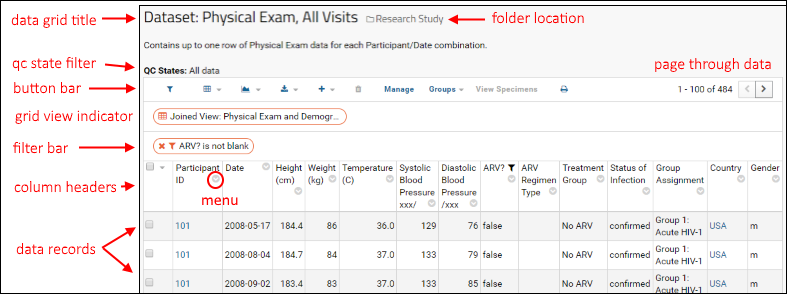
More infos in the LabKey website:
LabKey Comunity Resources
To learn more about using the platform, please visit one of the community resources freely available on labkey.org:
If you need further assistance, LabKey provides professional support, customization and development. Please contact us.
Thanks for installing LabKey Server.
Regards,
The LabKey Team
www.labkey.com