How to inspect data in a table?
Data can be filtered, sorted and graphically represented.
Filtering and sorting:
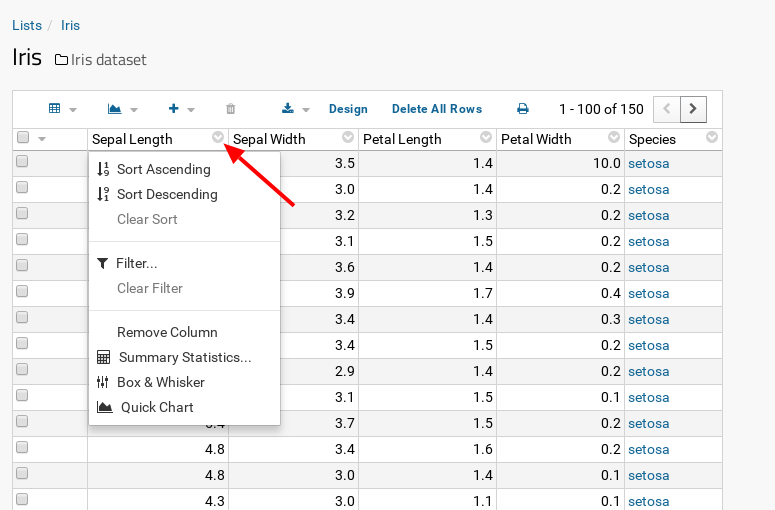
- In the table, click on the header of a column; a menu appears with choices to sort, filter or create several kinds of charts and summaries for the column data.
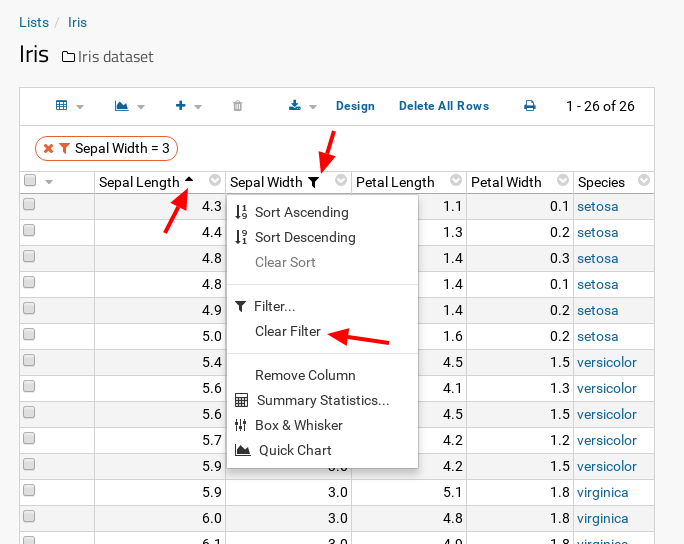
- After sorting and/or filtering, icons appear in the corresponding columns. To remove sorting and/or filtering, click in the menu "Clear Sort" and/or "Clear Filter".
Several sorts and/or filters can be applied in several columns at the same time.
Creating charts:
Two possibilities:
- Use the charts menu(es) on the header of the columns (e.g. "Quick Chart").
- Use the menu "Charts / Reports" icon
 at the top of the table.
How to add / remove a column in a table?
- On the header of the table click "Design".
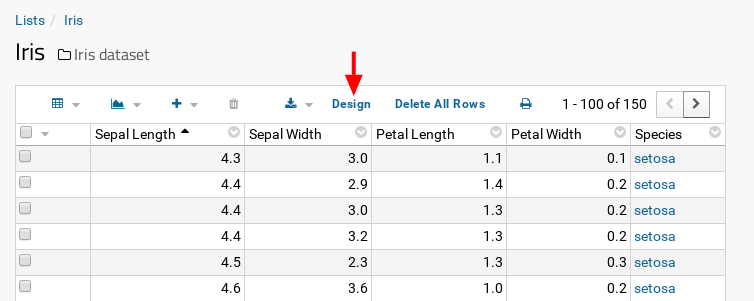
- Click "Edit Design".
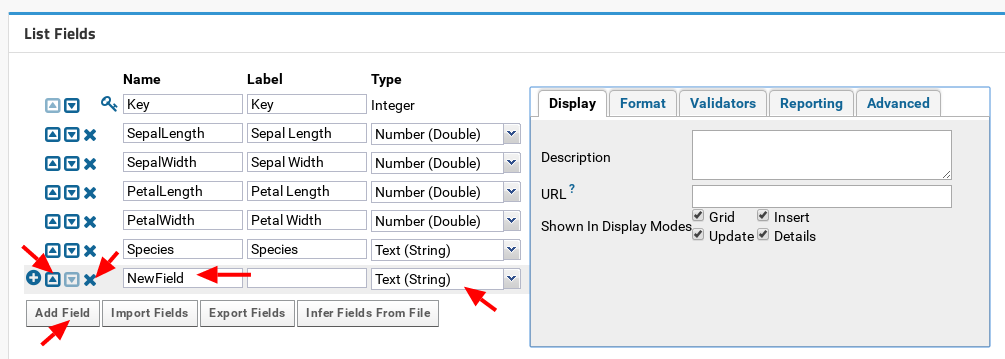
- Click "Add Field" at the bottom of the page, and enter at least a name and a type for the new field.
With the arrow icons, the fields can be placed more up or down in the list of fields.
To remove a field, click on the cross icon next to the field.  By deleting a field, all its data will be deleted as well.
- Confirm by clicking the "Save" button placed at the top of the page.
- Once a new field has been added, it is necessary to make it visible in the list or table. See the next question How to add / remove a column in a view?.
How to add / remove a column in a view?
- To visualize a column from the current table or from a linked table, select "Customize Grid" from the dropdown menu "Grid Views" with icon
 .
.
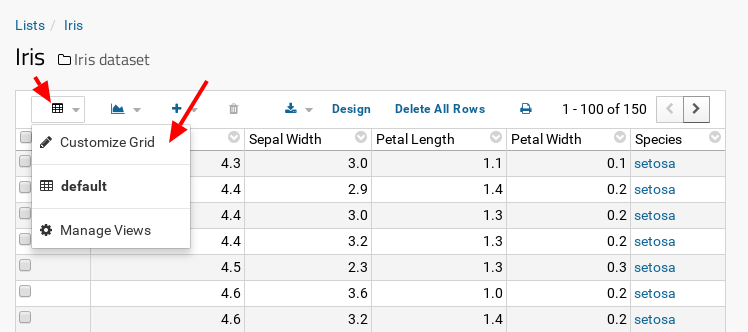
- Check the new field in the right-side list "Available Fields" and it will appear in the left-side list "Selected Fields".
Remarks:
- If the column to be seen is a hidden one, activate first the checkbox "Show Hidden Fields" on the bottom right side of the "Available Fields" panel.
- If the column to be seen belongs to another table, first expand the joined field by clicking the cross placed on the left side of the field name in the "Available Fields" panel. Please, check the FAQ How to link two lists using lookup columns? for more details on adding columns from other tables.
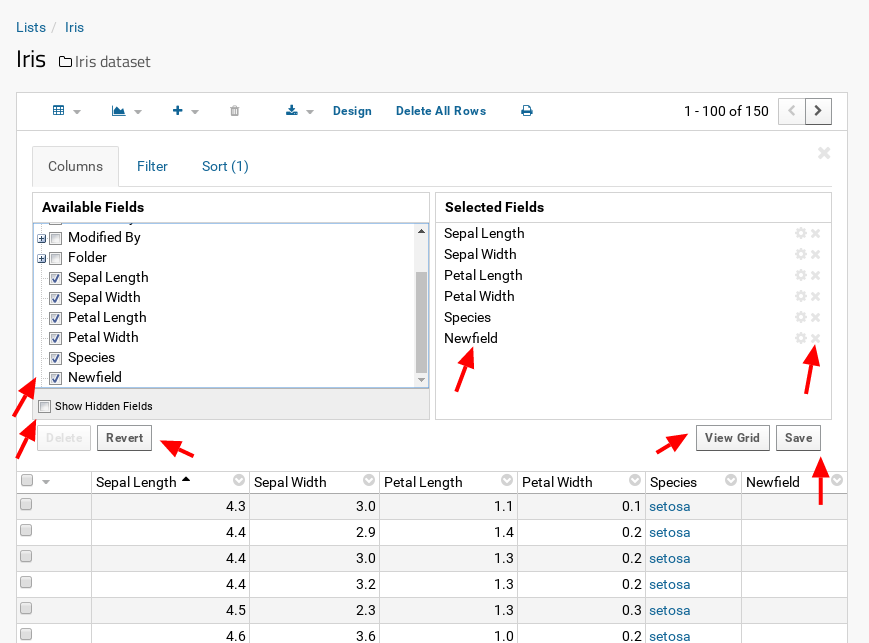
The fields can be placed in an upper or lower position by drag and drop in the "Selected Fields" panel.
They can also be removed from the view (but not from the table, so no data loss) by clicking on the cross icon in the "Selected Fields" panel.
- Click on the "View Grid" button, to inspect the resulting view.
The view can also be saved directly without inspecting, by clicking on the "Save" button, or discarded to undo any changes by clicking at the "Revert" button.
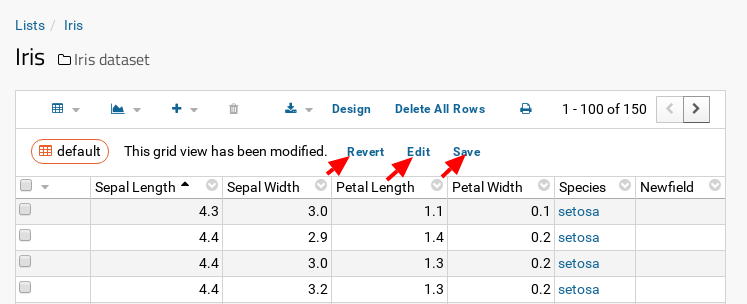
- If "View Grid" button was chosen, click on the "Save" button to save the view, discard it by clicking on the "Revert" button, or continue editing the view by clicking on the "Edit" button.
- To add pre-defined sorting and filtering to the view columns, check the LabKey documentation Saved Filters and Sorts.
How to restrict allowed values in a column?
Allowed values in a column can be configured by using validators. There are 3 types of validators:
-
Regex Validators: for text, numerical and lookup columns
-
Range Validators: for numerical and lookup columns
-
Lookup Validators: for lookup columns
Once a validator has been added to a column, trying to insert a value which does not comply with the validator rule, will not be allowed and will show an error message.
Example: How to set up a regex validator
(the other types of validators are set in the same way)
- On the header of the table click "Design".
- Click "Edit Design".
- In the section "List Fields" select the corresponding field.
- Select the "Validators" tab and click on the button "Add RegEx Validator" to open a pop-up window.
 It might be necessary to scroll up the page to see the just opened validator pop-up window.
- Add the regex pattern which should match the column values.
In this example:
-
Name: Gender Value Validator
-
Regular Expression: M|F|M\?|F\?|NA|Juvenile
-
Error Message: Please, enter one of the following values: M, F, M?, F?, Juvenile or NA
-
Fail when pattern matches: No (unchecked)
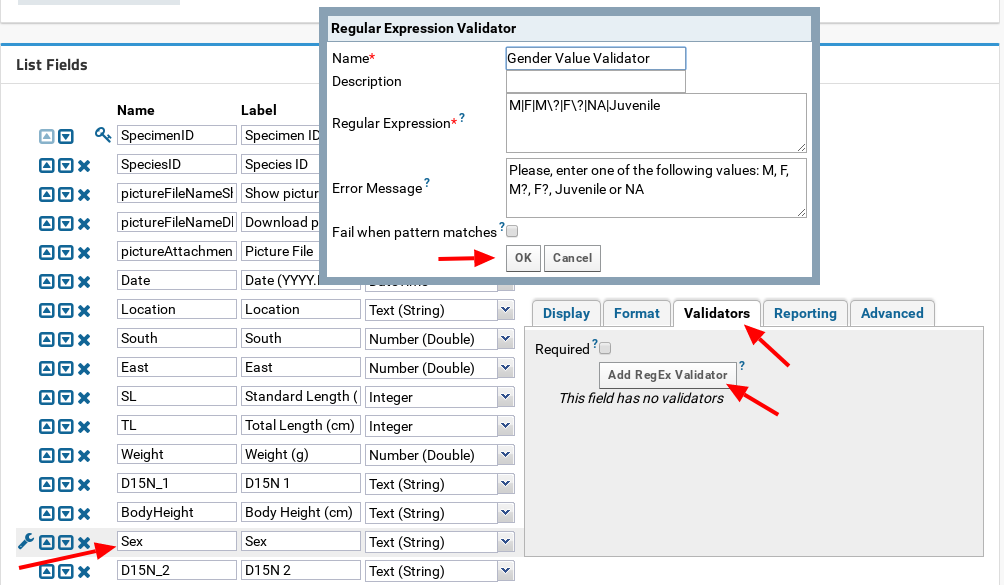
- Validate with "OK".
- Save the table design by clicking on the "Save" button on the top of the page.
- As a result, the field (in this example "Sex") will not accept any value which does not match the regular expression given.
What are "Missing Value Indicators"?
Missing Value Indicators (MVI) are useful in situations like:
- A field is of type boolean (True/False), and therefore not accepting "empty" or "null" values. MVI is an alternative to that.
- A field is of type number, but in the data files to import, the field has some times a string value (e.g. UNKNOWN, ---, etc...) indicating that the value is not present. To import those files, it is necessary to define those non-number values as MVI and configure the field to accept them.
- "Delete" some value temporarily and mark it for necessary quality control. Once quality is accepted, the field will be assigned automatically the "deactivated" value.
- Simply to highlight in the User Interface that a value is missing.
Missing Value Indicators have several uses:
- Allow for an alternative value to data which either do not have an available value, or have a non-allowed value type (e.g. the value is a string but the field is of type number, or the value is unknown but the field is a boolean and therefore allows only the values True or False).
- Allow deactivation of "suspect" values and assignment of a reason for its deactivation.
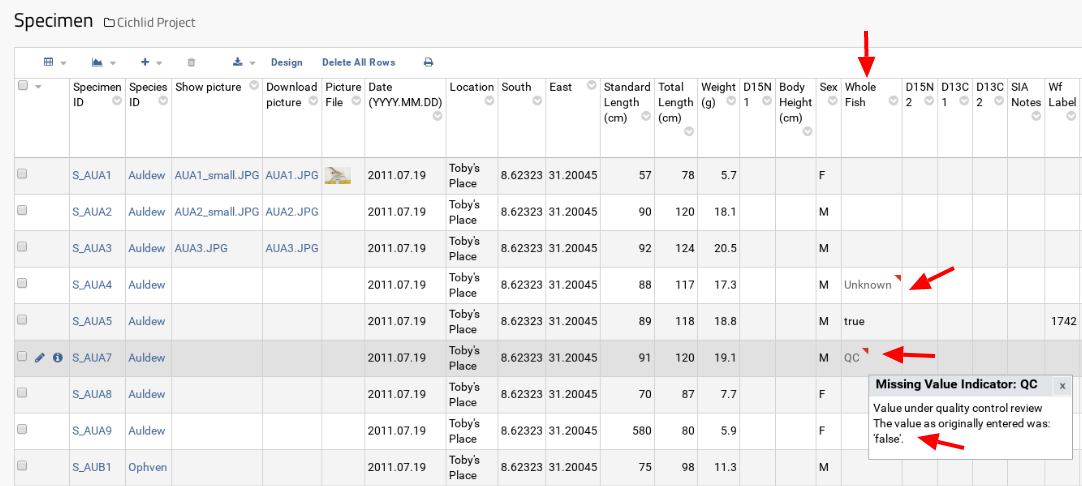
- Highlight MVI: they are marked with a red triangle on the upper right part of the value cell.
When a column contains a Missing Value, this is deactivated, i.e. its value will be kept in LabKey, but it will be missing in data exports.
E.g.: The field "WholeFish" is of type boolean. Activation of "Missing Value Indicators" for this field, makes it able to accept the available special value "Unknown" to indicate that the value is originally missing. On the table view it is shown having a red triangle:
How to set a field to allow "Missing Value Indicators"?
- On the header of the table click "Design".
- Click "Edit Design".
- In the section "List Fields" select the corresponding field.
- Select the "Advanced" tab and activate the "Missing Value Indicators" checkbox.
- Save the table design by clicking on the "Save" button on the top of the page.

How to change the values of "Missing Value Indicators"?
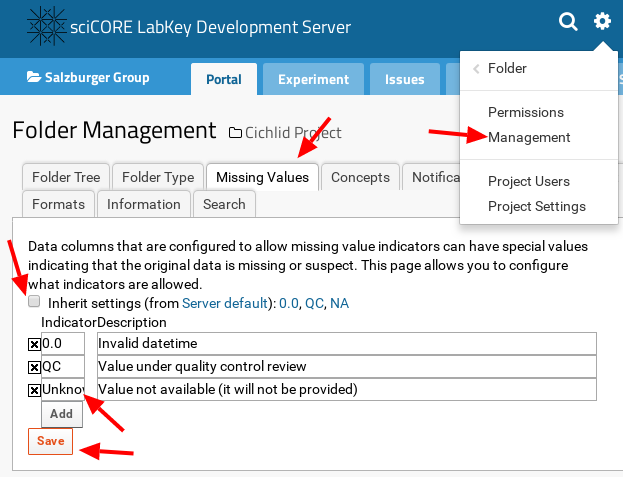
- Select the menu "
 --> Folder --> Management" on the top right-hand side of the page.
- Select the "Missing Values" tab.
- If activated, deactivate the "Inherit settings" checkbox.
- Add new, remove or modify the text of existing indicators.
- Confirm by clicking the "Save" button.
How to download / upload images?
Download selected images (files)
- Select the "Files" web part.
- Select the folder where the images are stored.
- Select the files to download by checking them.
- Press the "Download" icon.
That will download a zip file with the selected contents.

Download a folder or folders
- Select the folder to download by checking it.
- Press the "Download" icon
That will download a zip file with the selected contents.
Upload
- By drag and drop:
-
- Select the files to upload in your File Browser.
- Drag and drop them on the "Files" web part.
- By using the menues:
-
- Click on the "Upload Files" button.
- Press the button "Browse" and select a file to upload. This option can only upload one file at a time.
- Proceed as indicated.
- By using a WebDAV client with the target repository's URL. Check the FAQ How to find out the URL of a directory or file? to get the URL.
More information about uploading files and directories through WebDAV in the LabKey documentation: Upload Files: WebDAV.
How to find out the URL of a directory or file?
There are several ways:
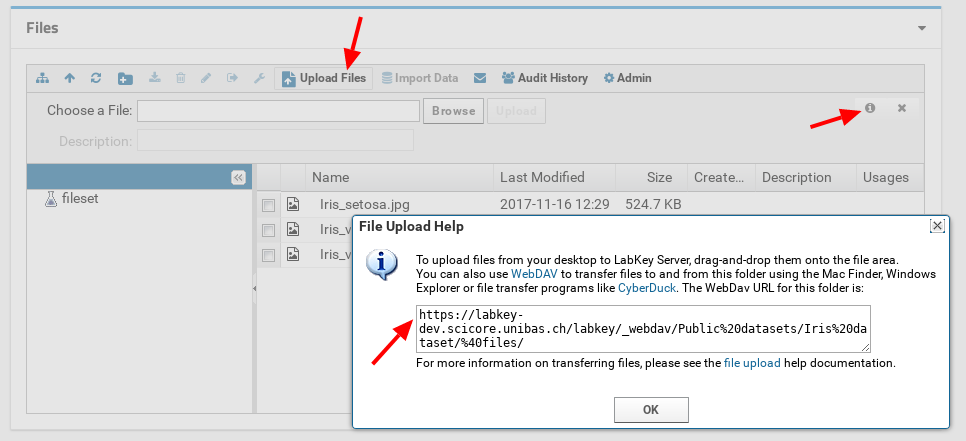
- Click at the information icon on the "Upload Files" menu of the "Files" web part.
For that, it is necessary first to click at the "Upload Files" button, and then the  icon which will appear on the right-side.
This opens a pop-up window with the URL, which can then be copied.
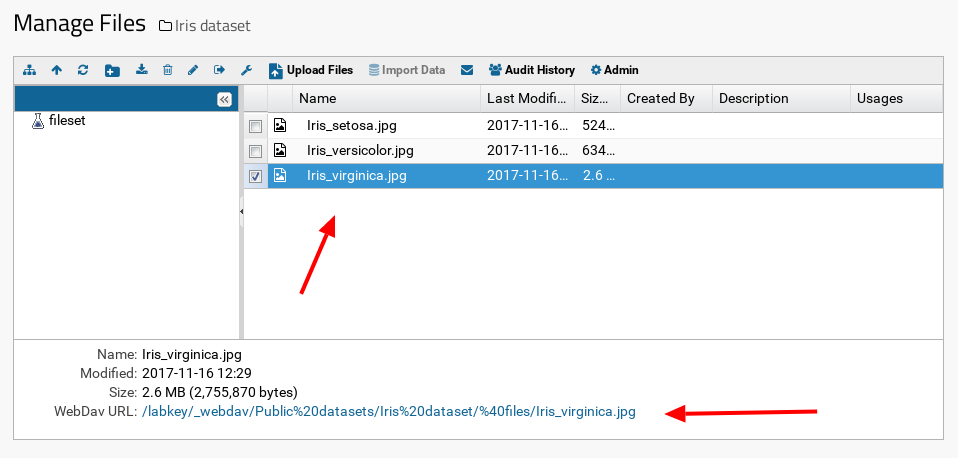
- Check the WebDav URL appearing on the bottom of the "Manage Files" module.
To open the "Manage Files" module, select the menu " --> Go To Module --> FileContent" on the top right-hand side of the page.
- Get the download link.
See the LabKey documentation "Share and View Files" on how to get this link.
How to link image files in a table to view / download them?
View
- Create a new column in the table of type "Text". In this example that is the field "imageLocal".
- Add in the "URL" input box of the field's "Display" tab, the path to the image file. E.g.
/labkey/_webdav/Public%20datasets/Iris%20dataset/%40files/${imageLocal}
This path consists of two parts:
-
- Path to the directory containing the images. Check the FAQ "How to find out the URL of a directory or file?" for help on evaluating this path.
- Variable for the name of the file. The variable consists on the name of the column containing the file name surrounded by
${ and }
Download
- Create a new column in the table of type "Text".
- Add in the "URL" input box of the field's "Display" tab, the path to the image file. E.g.
/labkey/_webdav/Public%20datasets/Iris%20dataset/%40files/${imageLocal}?contentDisposition=attachment
This path consists of three parts:
-
- Path to the directory containing the images. Check the FAQ "How to find out the URL of a directory or file?" for help on evaluating this path.
- Variable for the name of the file. The variable consists on the name of the column containing the file name surrounded by
${ and }
- Query string to trigger a download:
?contentDisposition=attachment
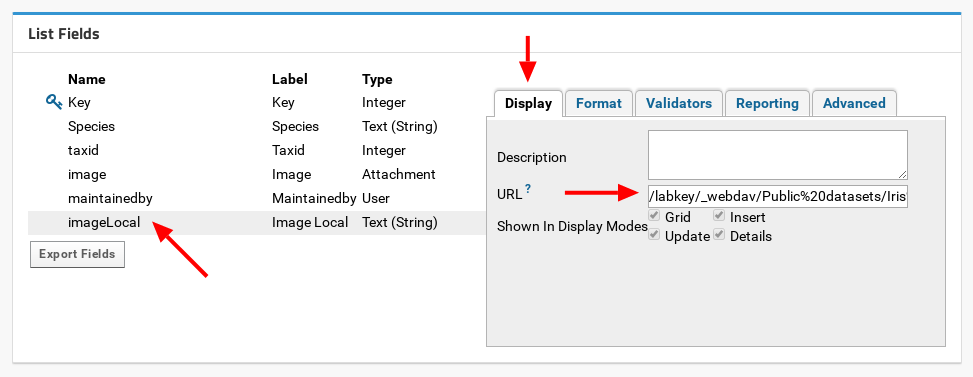
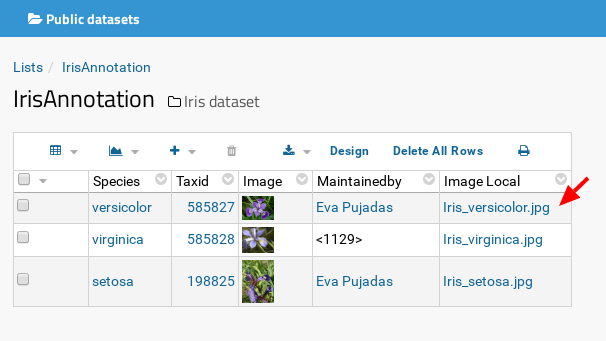
In both cases, the field which contains the URL needs to be populated with the name of the file to view or download (e.g. "Iris_versicolor.jpg").
When clicking on the file link, the image will be displayed or downloaded.
How to use "Labels" and "Descriptions" in a column?
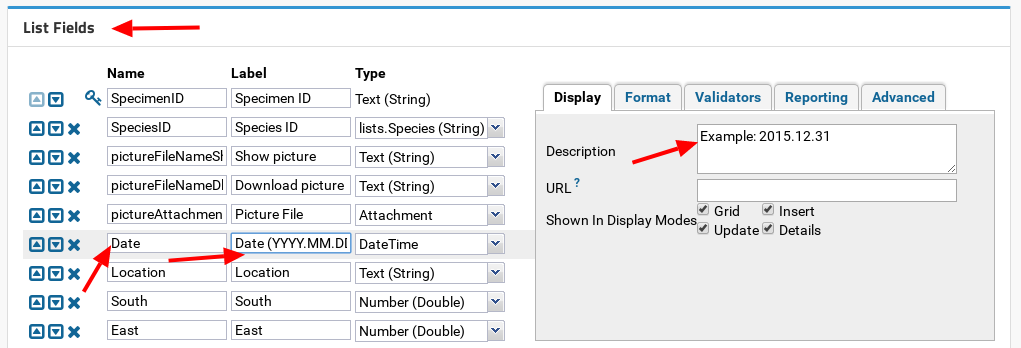
Each column in a table can have a "Label", which will be shown as the table column header, and a "Description".
- On the header of the table click "Design".
- Click "Edit Design".
- In the section "List Fields" select the corresponding field.
- Label:
-
- Enter the label text in the "Label" text box.
- Description:
-
- Select the "Display" tab on the right side of the panel.
- Enter the description text in the "Description" text box.
- Save the changes by clicking the "Save" button on the top of the page.
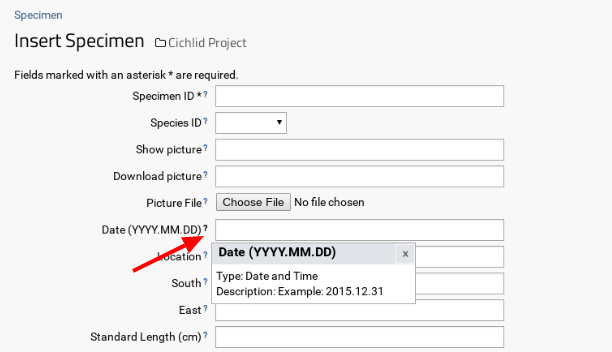
- The label will appear as header in the view column, and the description in the tooltip.
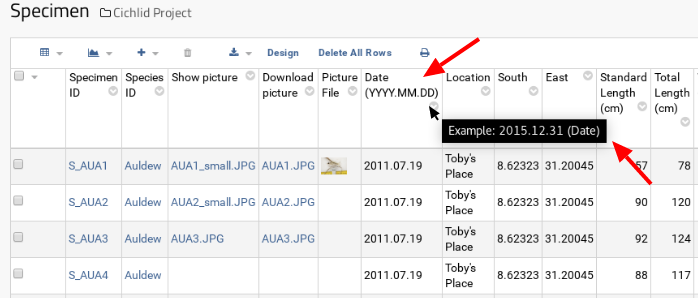
- When inserting a new record, the label will appear as input label and the description as tooltip.
 The label can also be used as column name in data files to import. See the FAQ How to populate an existing table with data from a file? for more information on this subject.
What are conditionally formated a fields?
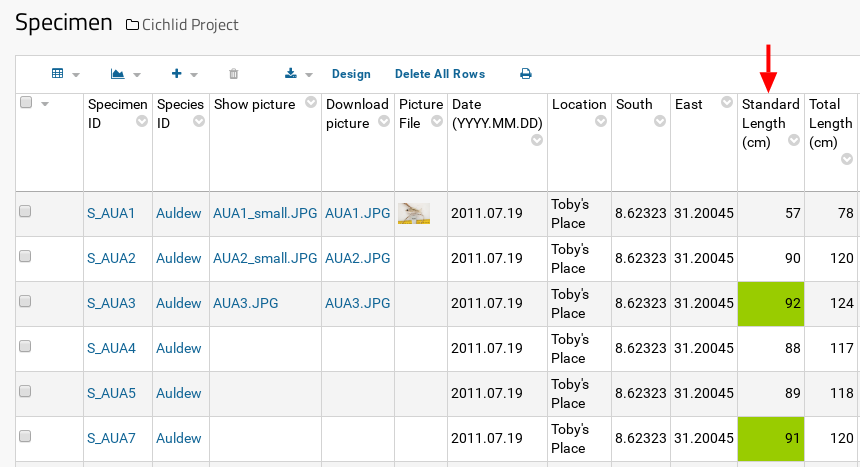
Values display on a column can be changed in different ways: bold, italics, color, background's color, etc.. depending on the value.
Below an example, where it can be seen that the field "Standard Length" has been formatted to show its background green when the value is greater than 90:
How to conditionally format a field?
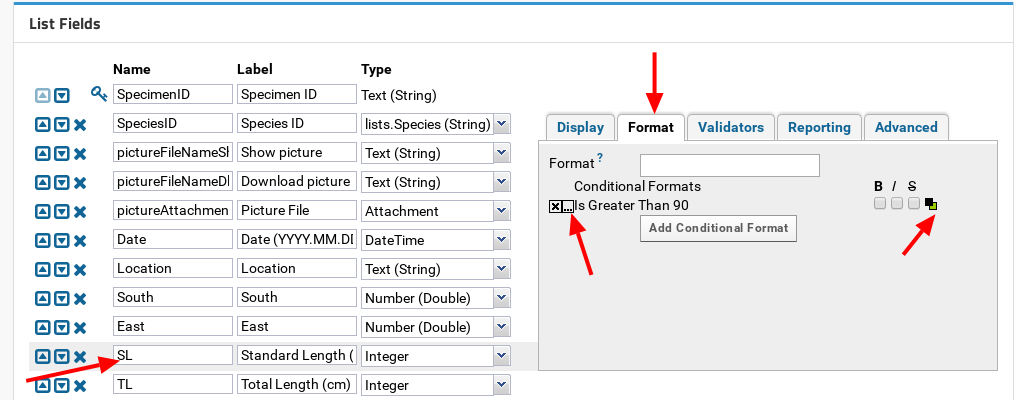
- On the header of the table click "Design".
- Click "Edit Design".
- In the section "List Fields" select the corresponding field.
- Select the "Format" tab and click the "Add Conditional Format" button.
- Enter the filter type and its value.
- On the right side of the format, activate the checkboxes for bold (B), italics (I), strike-through (S) and / or select a color (for font or background).
- Save the changes by clicking the "SAVE" button on the top of the page.


 at the top of the table.
 By deleting a field, all its data will be deleted as well.
 .
.


 It might be necessary to scroll up the page to see the just opened validator pop-up window.


 --> Folder --> Management" on the top right-hand side of the page.

 icon which will appear on the right-side.
 --> Go To Module --> FileContent" on the top right-hand side of the page.


 The label can also be used as column name in data files to import. See the FAQ How to populate an existing table with data from a file? for more information on this subject.
